
TL;DR
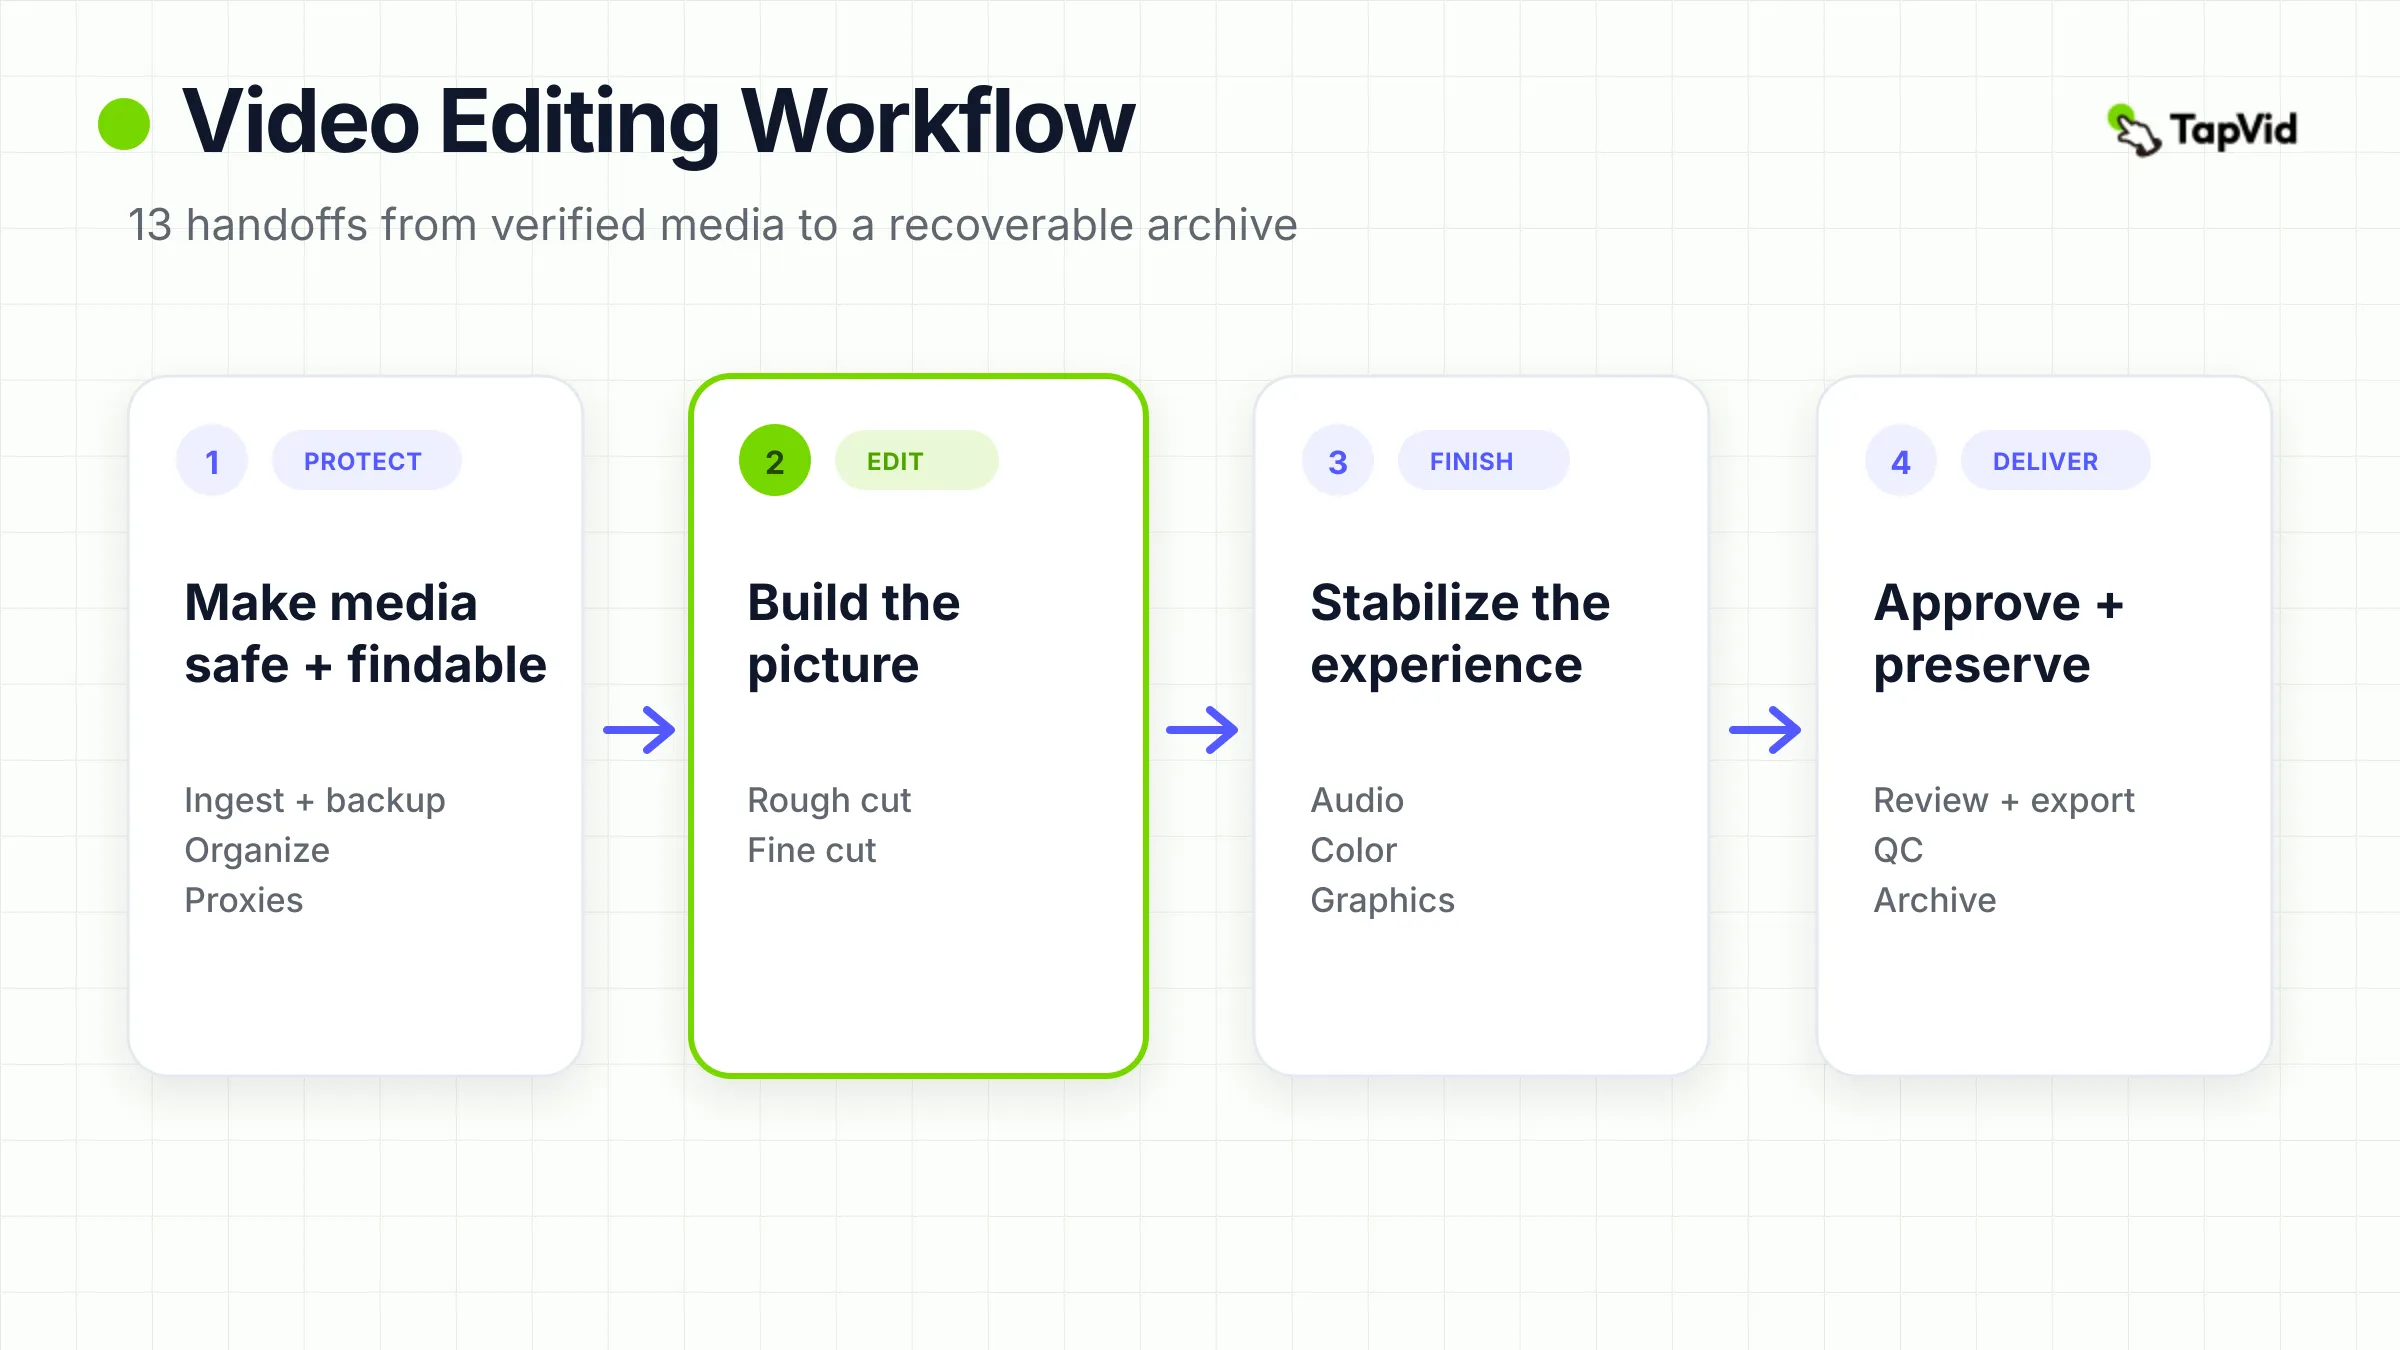
A reliable video editing workflow moves through 13 controlled stages: ingest, backup, organization, proxies, rough cut, fine cut, audio, color, graphics, review, export, quality control, and archive. Each stage should produce a defined output before the next begins. Verify copied media before editing, preserve original files, keep proxies linked to their camera originals, separate story decisions from finishing decisions, review a stable file, test the exported file rather than trusting the timeline, and archive enough context to reopen the project later.
A video editing workflow is the sequence of decisions and handoffs that turns received media into a finished, verified, recoverable video. The useful unit is not a software button or a folder name. It is a stage with a known input, a bounded job, and an exit condition. Adobe's current Premiere documentation makes the same distinction at the front of the process: ingest copies or transcodes source media into managed project storage, while proxies are lighter copies attached to full-resolution media for editing performance. Those jobs are related, but they are not interchangeable (Adobe, 2026).
That distinction matters because most post-production failures cross stage boundaries. A card is copied but never verified. A proxy loses its relationship to the camera original. A rough cut is sent for color before timing is stable. Reviewers comment on different files. An export looks correct in the timeline but contains a muted channel or missing caption track. The final master survives, but the project cannot be reopened six months later.
This guide uses a software-agnostic workflow for solo editors and small teams. It applies to interviews, screen recordings, tutorials, product videos, short documentaries, and mixed-media projects. Large film, broadcast, and VFX pipelines divide the same work among more specialists and may use formal conform, turnover, and delivery systems. The principle remains useful at either scale: do not advance a project merely because someone is tired of the current stage.
01
Define the handoff before you open the timeline
A workflow controls uncertainty. At the start, you do not yet know whether every source file copied correctly, whether the story works, whether the chosen shots cut together, whether the dialogue can be cleaned, or whether the destination will accept the finished file. Each stage should remove one class of uncertainty without reopening decisions that have already been settled.
Use four questions at every handoff:
- 1. What is the input? Name the files, timeline, notes, or approval state entering the stage.
- 2. What decision belongs here? A rough cut owns structure. A fine cut owns timing. Color should not quietly rewrite the story.
- 3. What proves the stage is complete? Completion might be a verified copy log, an approved cut, a clean audio pass, or a played-through export.
- 4. What can still change later? Record exceptions before they become emergencies. A legal correction may reopen graphics after picture lock, but it should do so deliberately.
This is different from video version control. Version control tells you what changed, why, which branch is current, and which output is approved. The workflow in this article tells you what must happen before a project is ready for the next post-production stage. If revisions, variants, approval states, or rollback are your main problem, use the deeper video version control guide alongside this one.
02
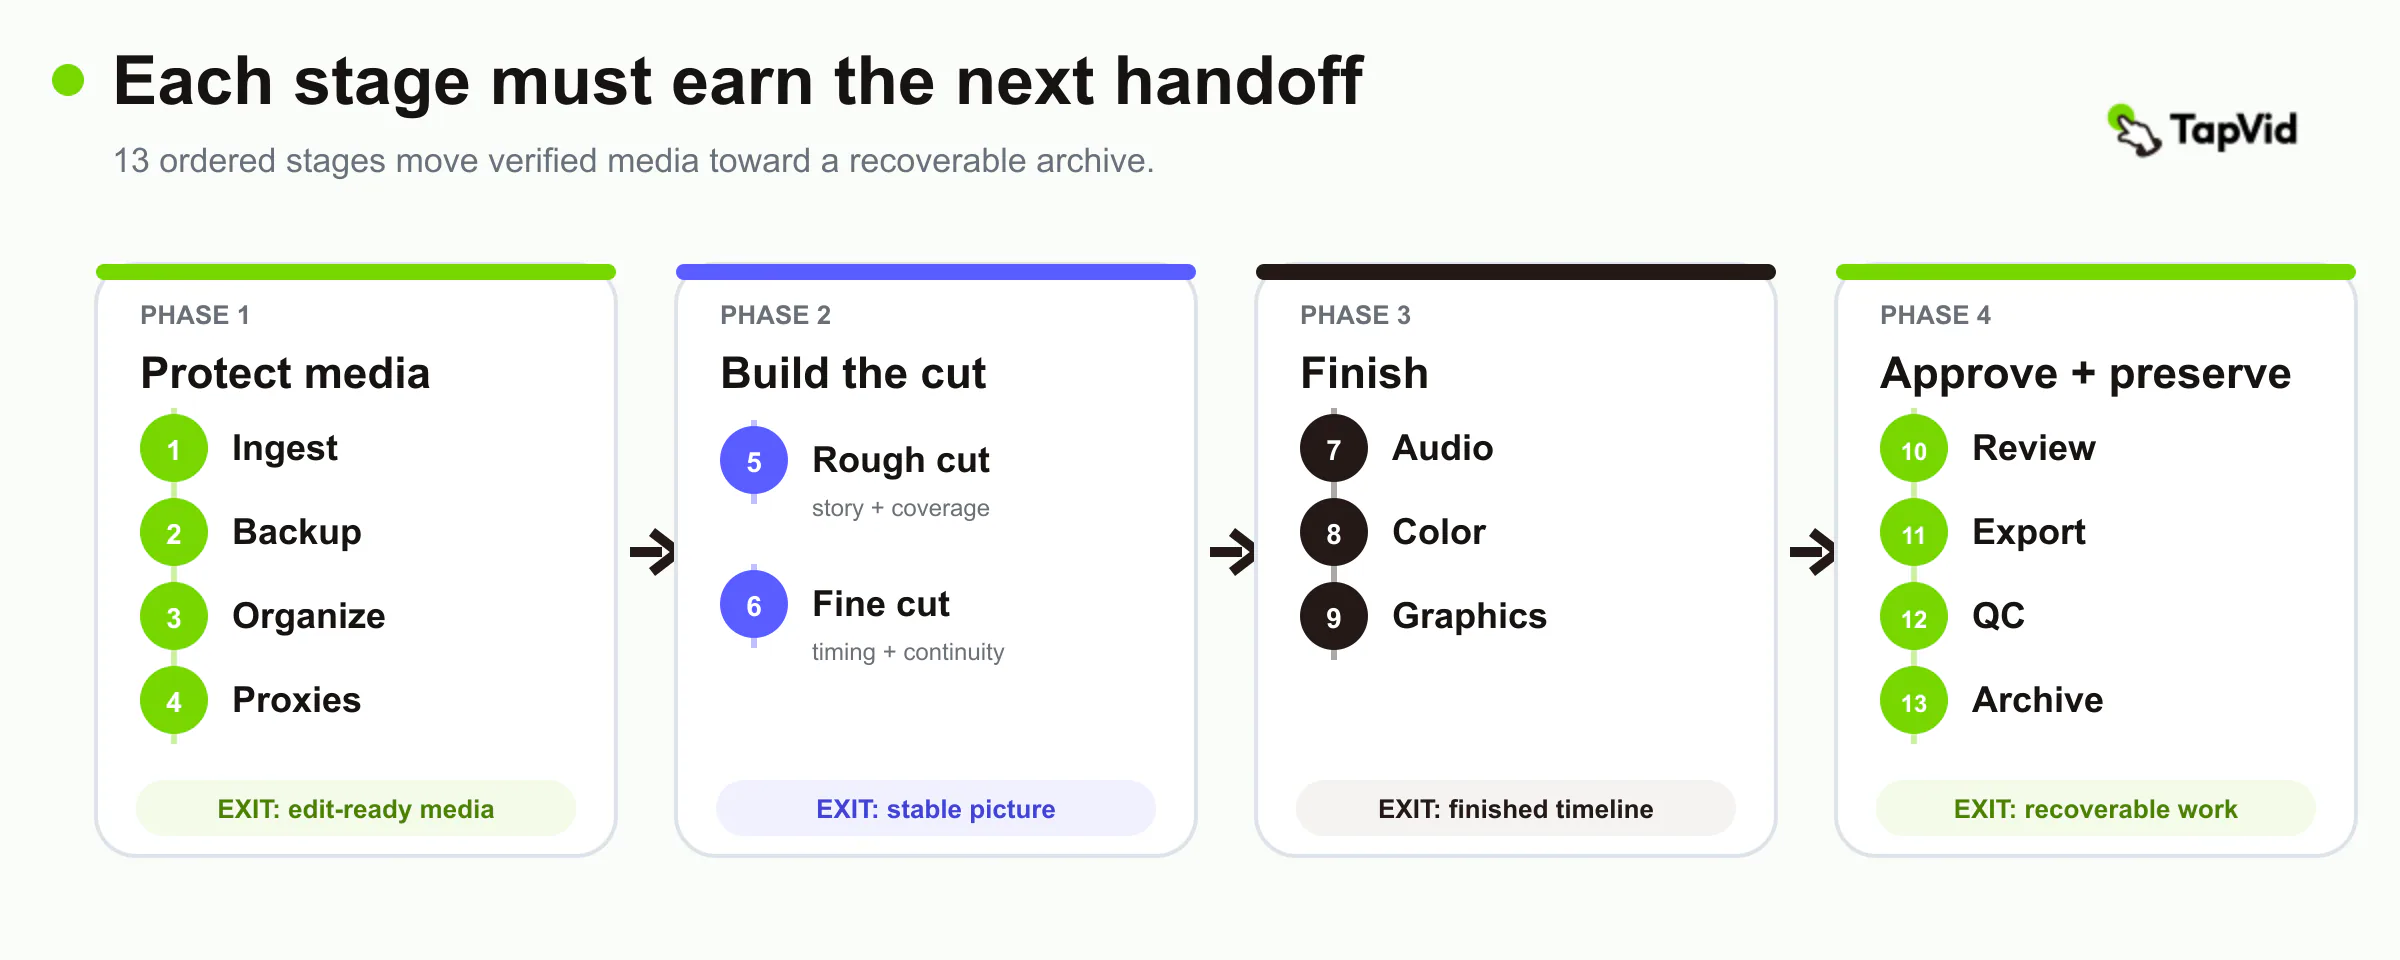
Order 13 stages by exit criteria
The stages below are ordered by dependency, not by the amount of time they take. A two-minute tutorial may spend most of its schedule in review. A documentary may spend weeks in the rough cut and one day creating graphics. The exit condition is more useful than a universal time estimate.
| Stage | Primary input | Exit condition | Failure caught before the next stage |
|---|---|---|---|
| Ingest | Camera cards, drives, uploads, production audio | All expected media copied, verified, and logged | Missing or damaged source media |
| Backup | Verified originals and project documents | Independent recoverable copies exist | One drive becoming the only copy |
| Organization | Verified media, notes, and metadata | Files and bins can be found without guesswork | Duplicate, ambiguous, or disconnected assets |
| Proxies | Full-resolution originals | Each proxy is attached and can relink to its original | Offline media or wrong-source finishing |
| Rough cut | Organized media and editorial brief | Story, order, coverage, and major omissions are visible | Polishing a structure that does not work |
| Fine cut | Approved rough-cut direction | Timing, continuity, shot choice, and picture are stable | Repeated downstream rework |
| Audio | Stable picture and source sound | Dialogue, effects, music, and loudness are controlled | Noise, clipping, sync, or masking problems |
| Color | Stable picture and known delivery space | Shots match and the intended look is consistent | Exposure, balance, gamut, or continuity errors |
| Graphics | Stable timing and approved facts | Titles, captions, diagrams, and overlays are accurate | Wrong copy, blocked captions, or illegible text |
| Review | Stable review file and scoped questions | Decisions are resolved and the candidate is approved | Conflicting or incomplete feedback |
| Export | Approved timeline and destination specification | A candidate file is rendered with known settings | Wrong codec, dimensions, frame rate, or tracks |
| QC | Exported candidate file | The actual file passes visual, audio, caption, and metadata checks | Timeline-to-file surprises |
| Archive | Approved masters, sources, project, and records | A future editor can locate, verify, and reopen the work | An unrecoverable or context-free project |
The table is a minimum operating model. Add specialist turnovers when the project needs them, such as VFX pulls, an audio mix handoff, translation, legal review, or a color conform. Do not remove verification simply because one person performs several stages.
03
Ingest footage and verify it before editing
Ingest begins when media leaves its capture or delivery source and enters controlled project storage. Copy the complete camera-card structure when the camera format depends on sidecar metadata. Keep production audio, graphics, fonts, scripts, licenses, release forms, and reference cuts with the same project intake rather than treating video clips as the whole project.
Create an ingest log before opening the editing timeline. Record the source label, date received, sender or camera, expected card or folder count, copy destination, verification result, and any missing or unreadable file. If media arrives through a transfer service, preserve the delivery note and original filenames. Renaming clips before the copy is verified makes it harder to compare what arrived with what was captured.
A completed progress bar proves that a copy operation stopped. It does not by itself prove that every expected file arrived intact. Use a copy tool that performs verification, or create and compare checksums when the risk and tooling justify it. The Library of Congress defines fixity as the property that a digital object has not changed between two points in time and describes comparing stored hash values as a way to monitor file integrity (Library of Congress). A checksum does not tell you whether a take is creatively usable, so add a bounded spot check: open representative clips from every card, confirm duration and audio channels, and inspect any file that the copy tool flagged.
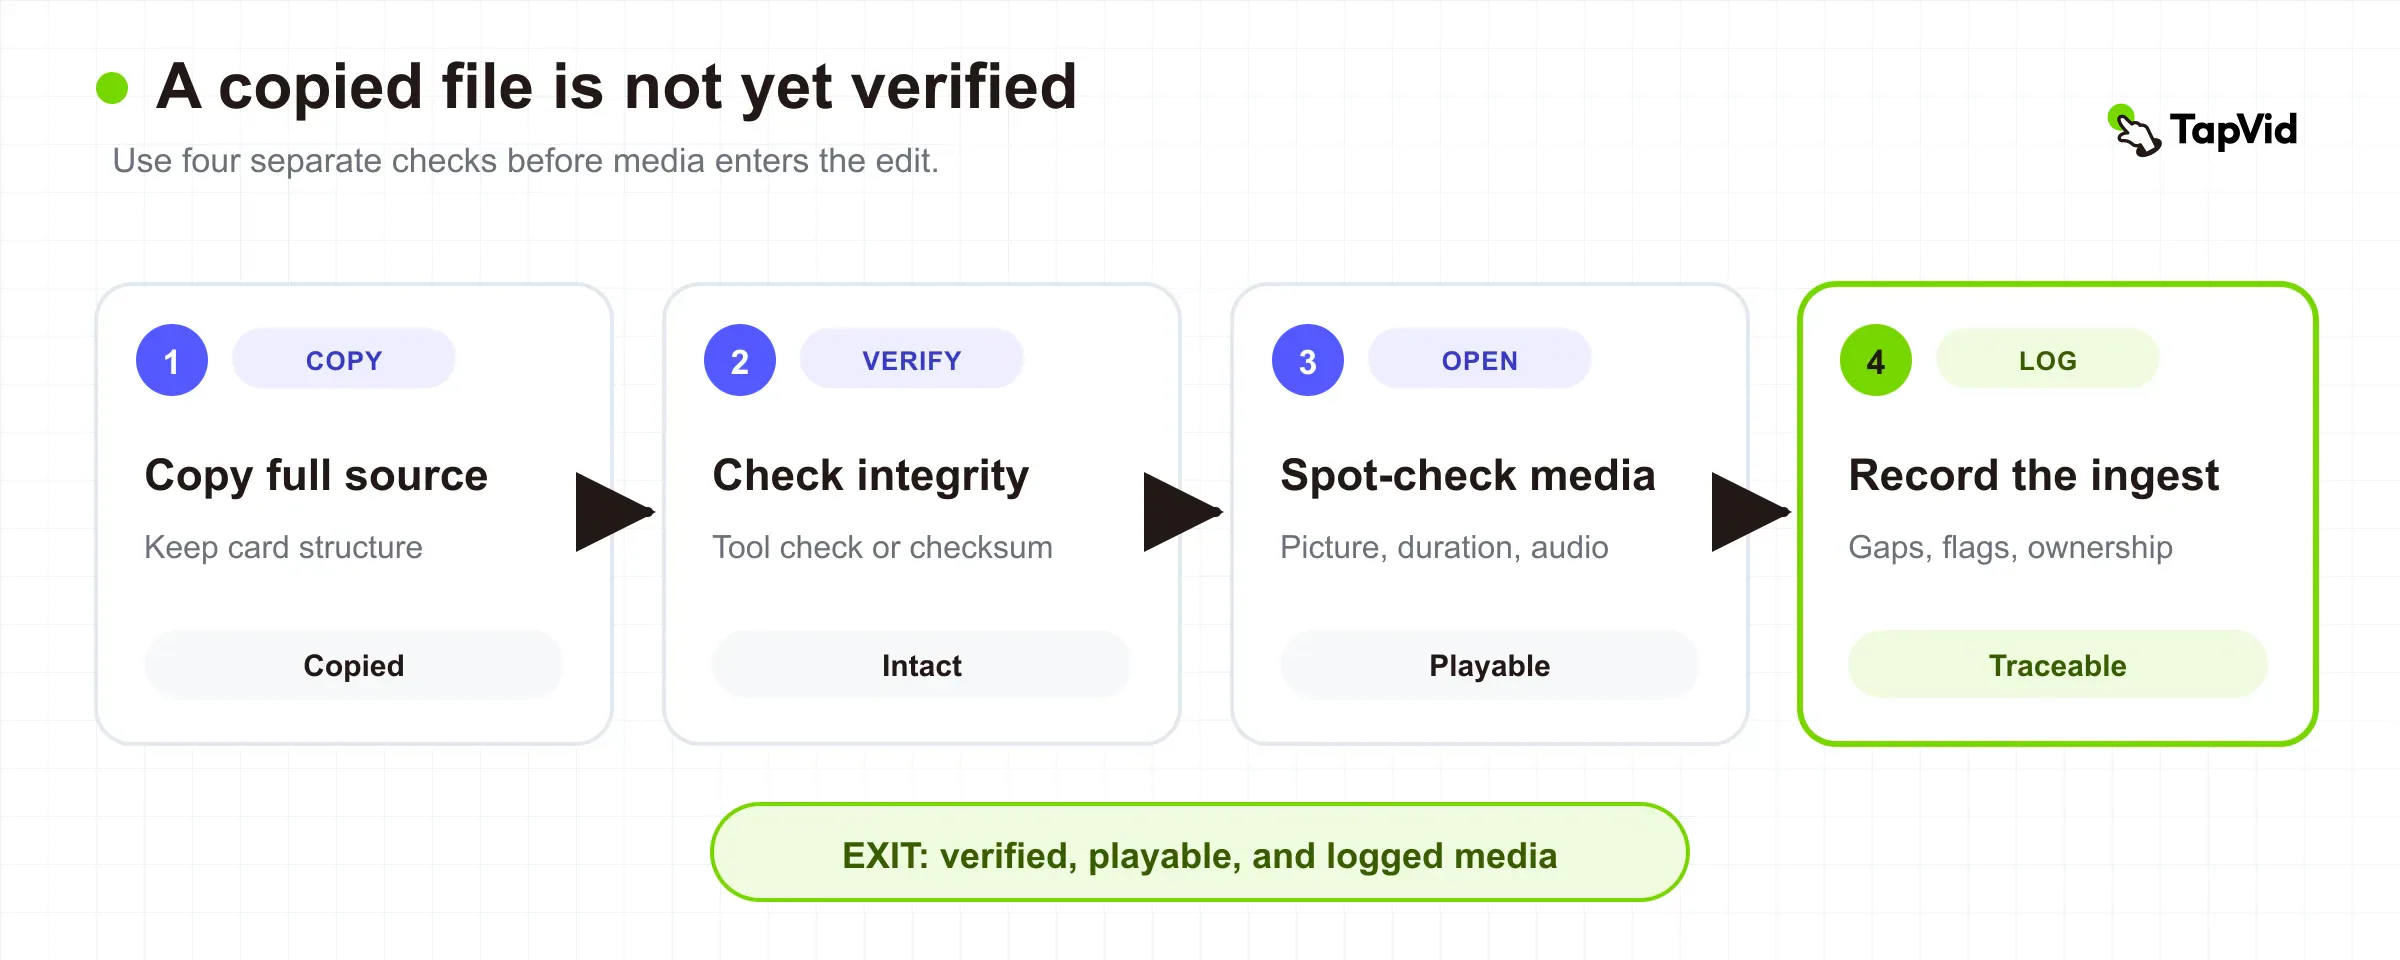
Do not format or return source media until the verified copies and required backups exist. If the schedule forces editing to start before every card is delivered, label the ingest as partial and keep a visible missing-media list. The stage is not complete simply because the editor can start cutting.
04
Back up originals before changing anything
Backup is a recovery design, not a folder named backup on the same drive. The U.S. Cybersecurity and Infrastructure Security Agency summarizes the 3-2-1 rule as three copies of important files, on two media types, with one copy stored offsite (CISA backup options). A small production may implement that as the verified working copy, a second local or network copy, and an offsite or cloud copy. A larger team may use managed storage, snapshots, and archival tiers.
The exact architecture depends on volume, upload speed, confidentiality, client terms, and recovery-time needs. The operating test is simple: identify which failure each copy survives. Two folders on one portable drive do not protect against drive failure. Two drives in one bag do not protect against theft. A cloud sync service that immediately mirrors accidental deletion may not behave like a versioned backup.
Protect originals from casual modification. Editing applications should reference a managed working copy, not the only camera card or the sole uploaded file. If an application writes cache, analysis, or sidecar data beside media, decide whether those writes are acceptable. Keep project databases and edit files on their own backup schedule because they change more often than camera originals.
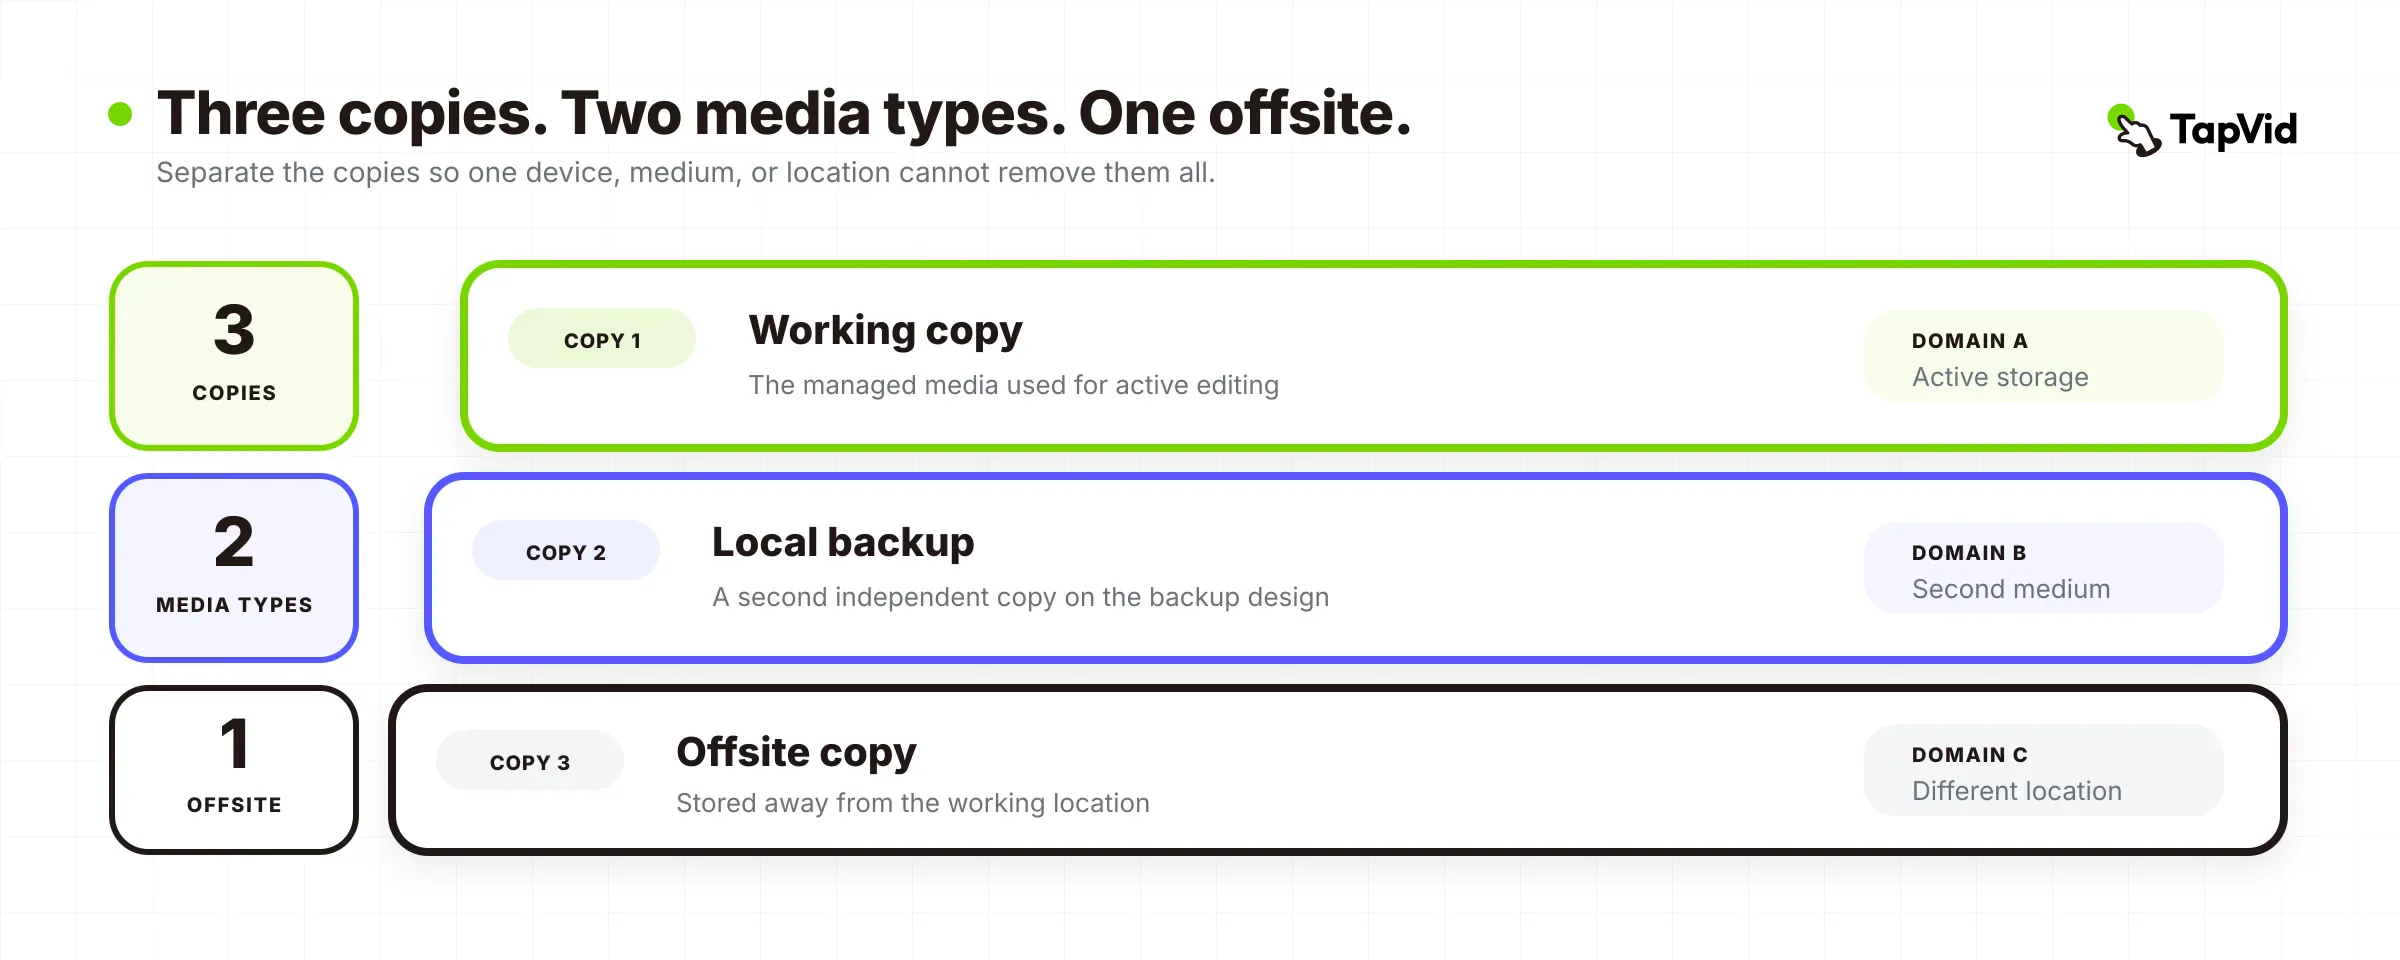
Test recovery early with one representative folder. Restore it to another location, open a clip, and compare its recorded checksum or file properties. A backup that has never been restored is an assumption. The goal is not to create unlimited copies. It is to make the loss of one device or service inconvenient rather than fatal.
05
Organize media for retrieval, not decoration
Good organization lets another person answer three questions quickly: what is this file, where did it come from, and where is it used? Start with a stable top-level structure such as 01_SOURCE, 02_PROJECT, 03_AUDIO, 04_GRAPHICS, 05_PROXIES, 06_REVIEW, 07_EXPORTS, and 08_ARCHIVE_DOCS. The numbers are optional. The separation of roles is not.
Mirror useful parts of that structure inside the editing application, but do not copy the disk tree blindly. Disk folders protect storage and handoff. NLE bins support editorial retrieval. An interview project may need bins by speaker, topic, and select status even though the files remain stored by shooting day. A product demo may need bins by feature and interface state. Use metadata, markers, and searchable descriptions when they reduce repeated scrubbing.
Preserve source identity. If you rename media, use a batch rule that keeps names unique and maintains a mapping to the originals. Do not create several unrelated files called Screen Recording 12.mov. Avoid moving source folders after the project is linked unless your application and team can manage the relink. Keep caches, previews, and generated waveforms separate from irreplaceable sources because they can usually be rebuilt.
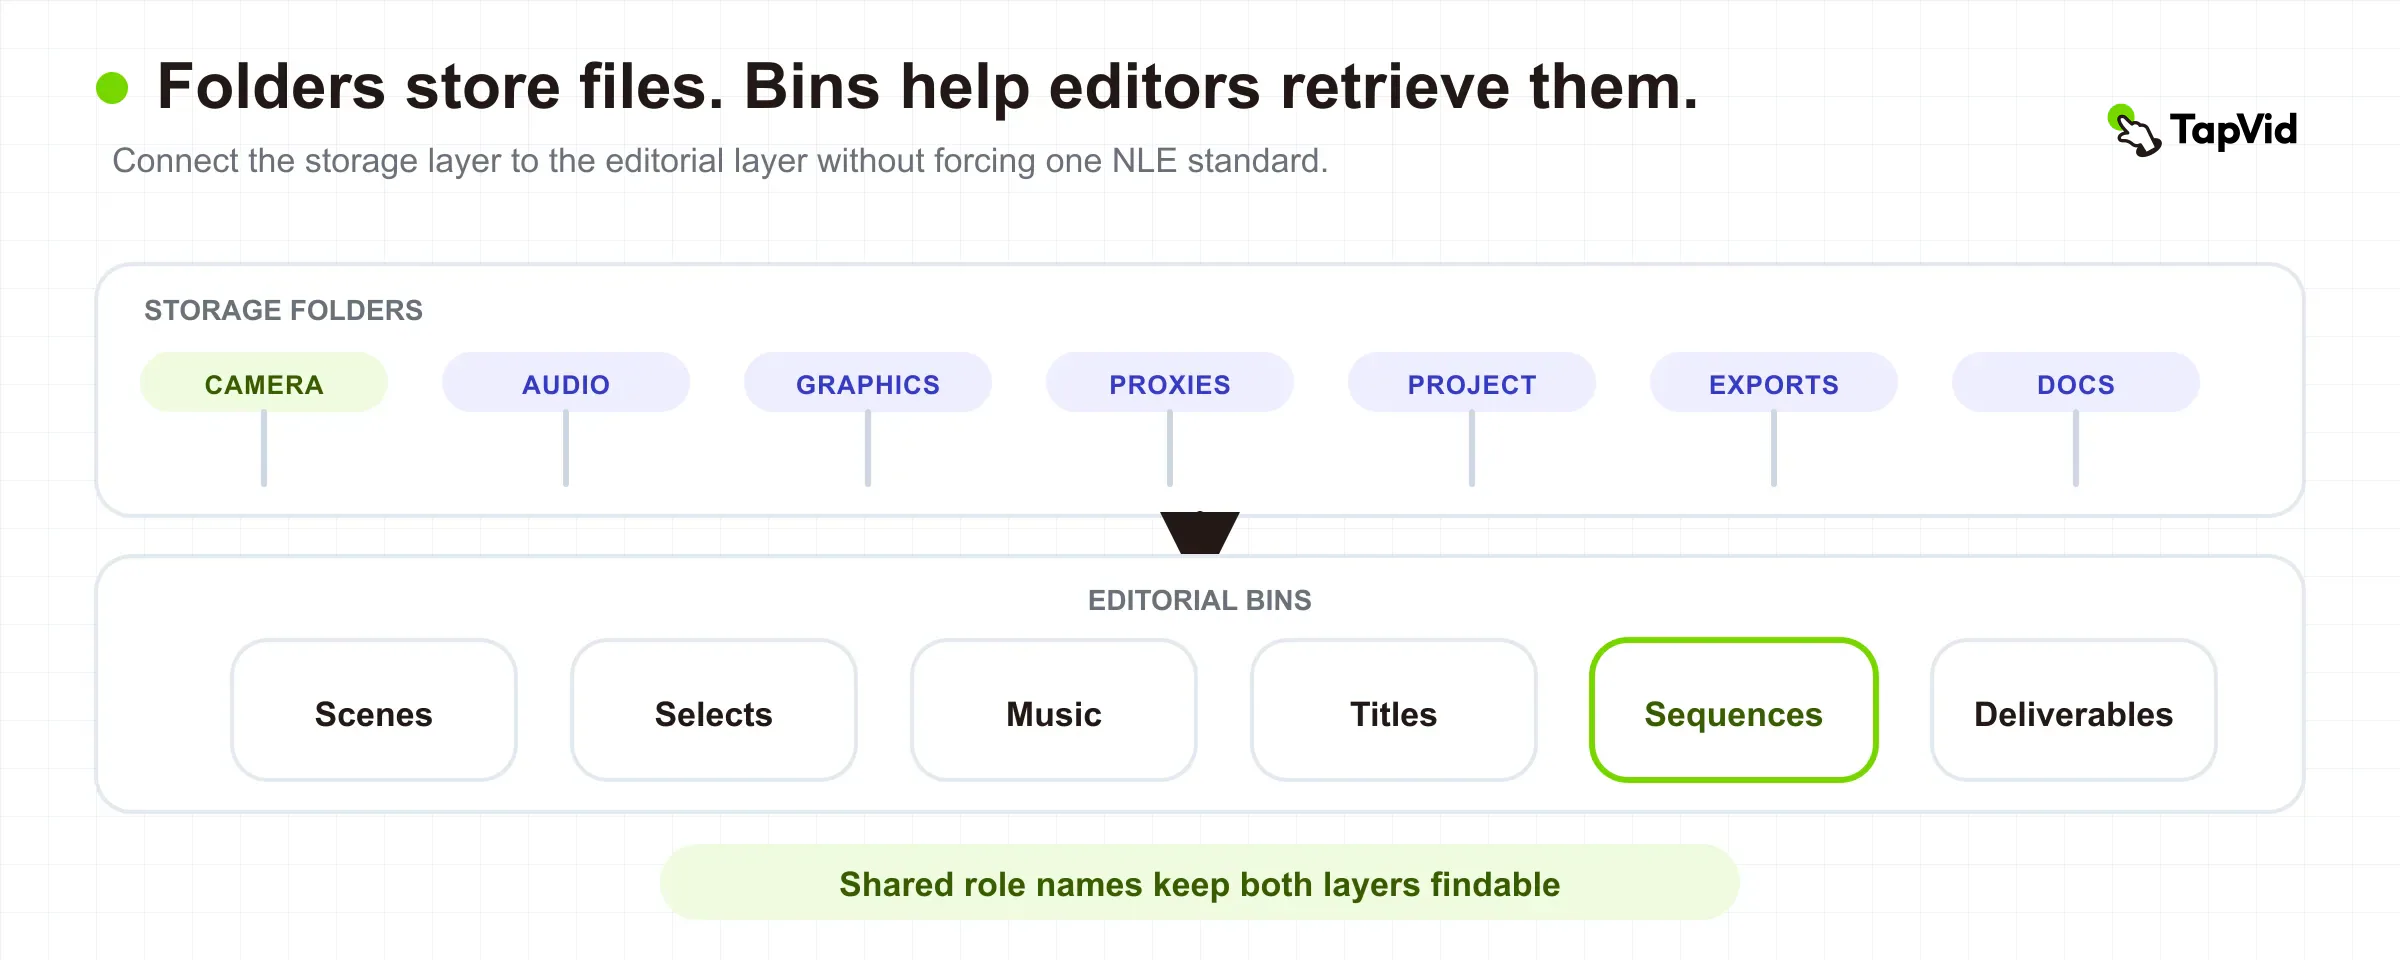
Organization is complete when a new editor can locate one requested shot, its production audio, the approved logo, and the current project file without asking where you personally put them. That test is more useful than a beautiful folder tree that only its creator understands.
06
Decide whether proxies are worth the setup
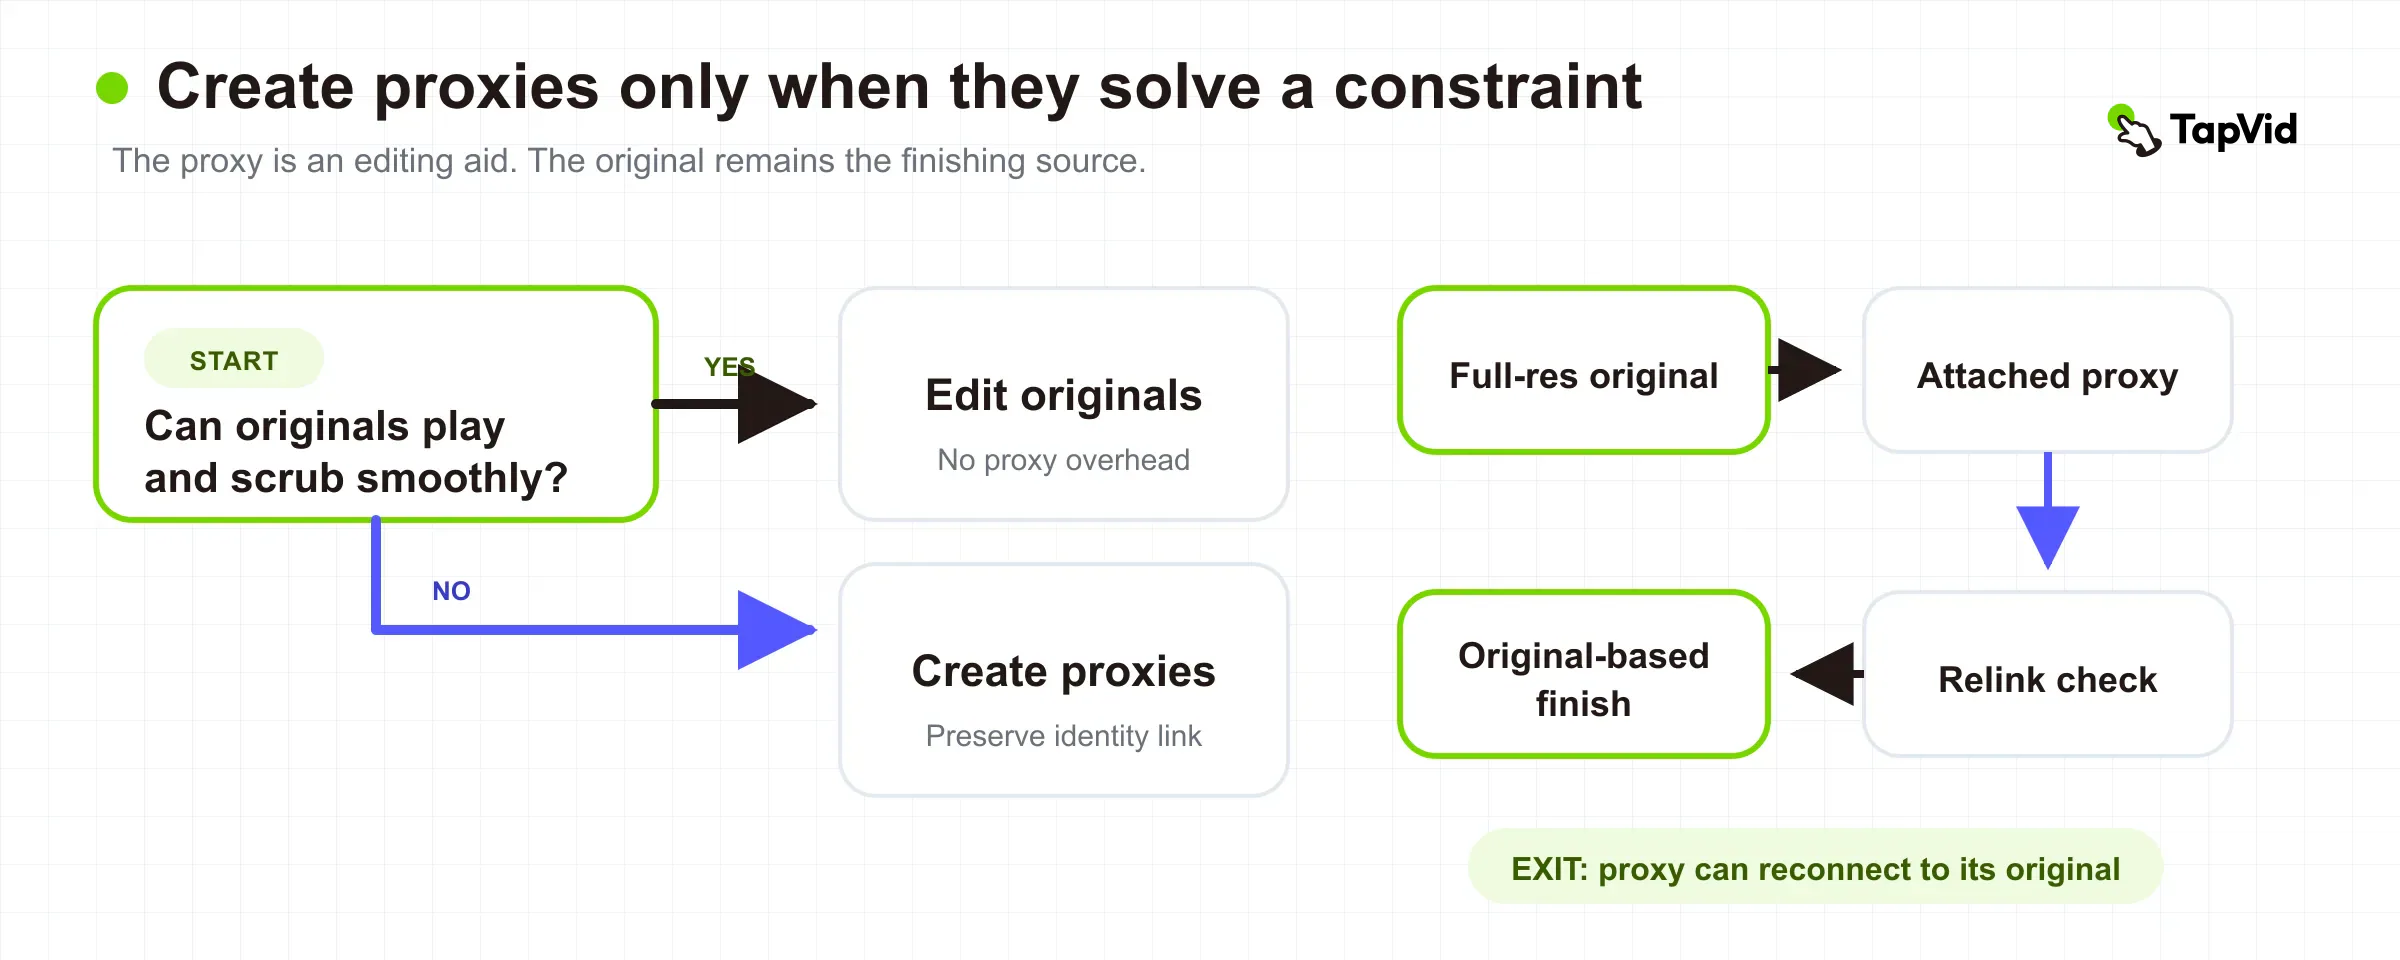
Proxies are lightweight editing copies attached to full-resolution source media. They can improve playback on demanding codecs, high-resolution footage, multicamera edits, remote workflows, or modest hardware. They do not improve source quality, repair damaged media, or replace a backup.
Create proxies when playback or scrubbing interrupts editorial decisions, when collaborators cannot move the originals efficiently, or when a consistent offline format simplifies a mixed-camera project. Skip them when original media already plays reliably and the relink overhead would cost more than it saves. Test a representative clip before transcoding an entire shoot.
Maintain identity between every proxy and its original. Preserve timecode, frame rate, audio-channel relationships, clip duration, and a naming or metadata link that the application can resolve. Adobe notes that externally created proxies must be attached to the corresponding full-resolution media and that Premiere normally uses full-resolution media for final export unless the editor explicitly selects proxy use (Adobe proxy attachment, Adobe proxy export). Other editors differ, so verify the behavior in the exact application and export path you use. The official Adobe Care walkthrough below demonstrates the proxy workflow in Premiere Pro.
Before picture finishing, switch to originals and run a relink or conform check. Inspect clips with speed changes, reframing, stabilization, multicamera edits, mixed frame rates, or external effects. If a proxy was made from the wrong source or with mismatched interpretation, the edit can appear correct until the final render.
07
Build a rough cut around story and coverage
Build a rough cut around story and coverage
- 1
Assemble the strongest usable material in an order that communicates the intended point.
The rough cut answers whether the video works before expensive finishing begins.
- 2
Separate selection from decoration.
Use temporary titles, rough music, basic level adjustments, and placeholders only when they help someone understand the cut.
- 3
Watch the rough cut in full before sharing it.
Look for structural failures before polishing individual cut points.
- 4
Confirm a stable editorial direction.
Reviewers should be able to judge purpose, order, completeness, and major omissions.
The rough cut answers whether the video works before expensive finishing begins. Assemble the strongest usable material in an order that communicates the intended point. For a tutorial, confirm that no required action is missing. For an interview, find the argument rather than preserving recording order. For a product video, make sure the proof appears before the call to action asks the viewer to believe it.
Separate selection from decoration. Use temporary titles, rough music, basic level adjustments, and placeholders only when they help someone understand the cut. Do not spend an hour animating a lower third for a section that may disappear. Leave visible notes for missing shots, screen captures, pickups, rights checks, or claims that still need approval.
Watch the rough cut in full before sharing it. Look for structural failures: a slow opening, repeated explanation, unsupported conclusion, missing transition, confusing chronology, or a section that exists only because it was difficult to shoot. Check coverage and continuity enough to know whether the sequence is feasible, but resist polishing every cut point.
The rough-cut exit condition is a stable editorial direction. Reviewers should be able to judge purpose, order, completeness, and major omissions. If they are still debating the audience, promise, or ending, the project is not ready for a fine cut.
08
Turn the rough cut into a fine cut and picture lock
The fine cut turns an approved structure into precise viewing. Refine shot choice, cut points, reaction timing, screen-demo pauses, continuity, pacing, and transitions. Replace editorial placeholders that affect timing. Confirm that every spoken claim has the necessary visual context and that the intended CTA has enough time to register.
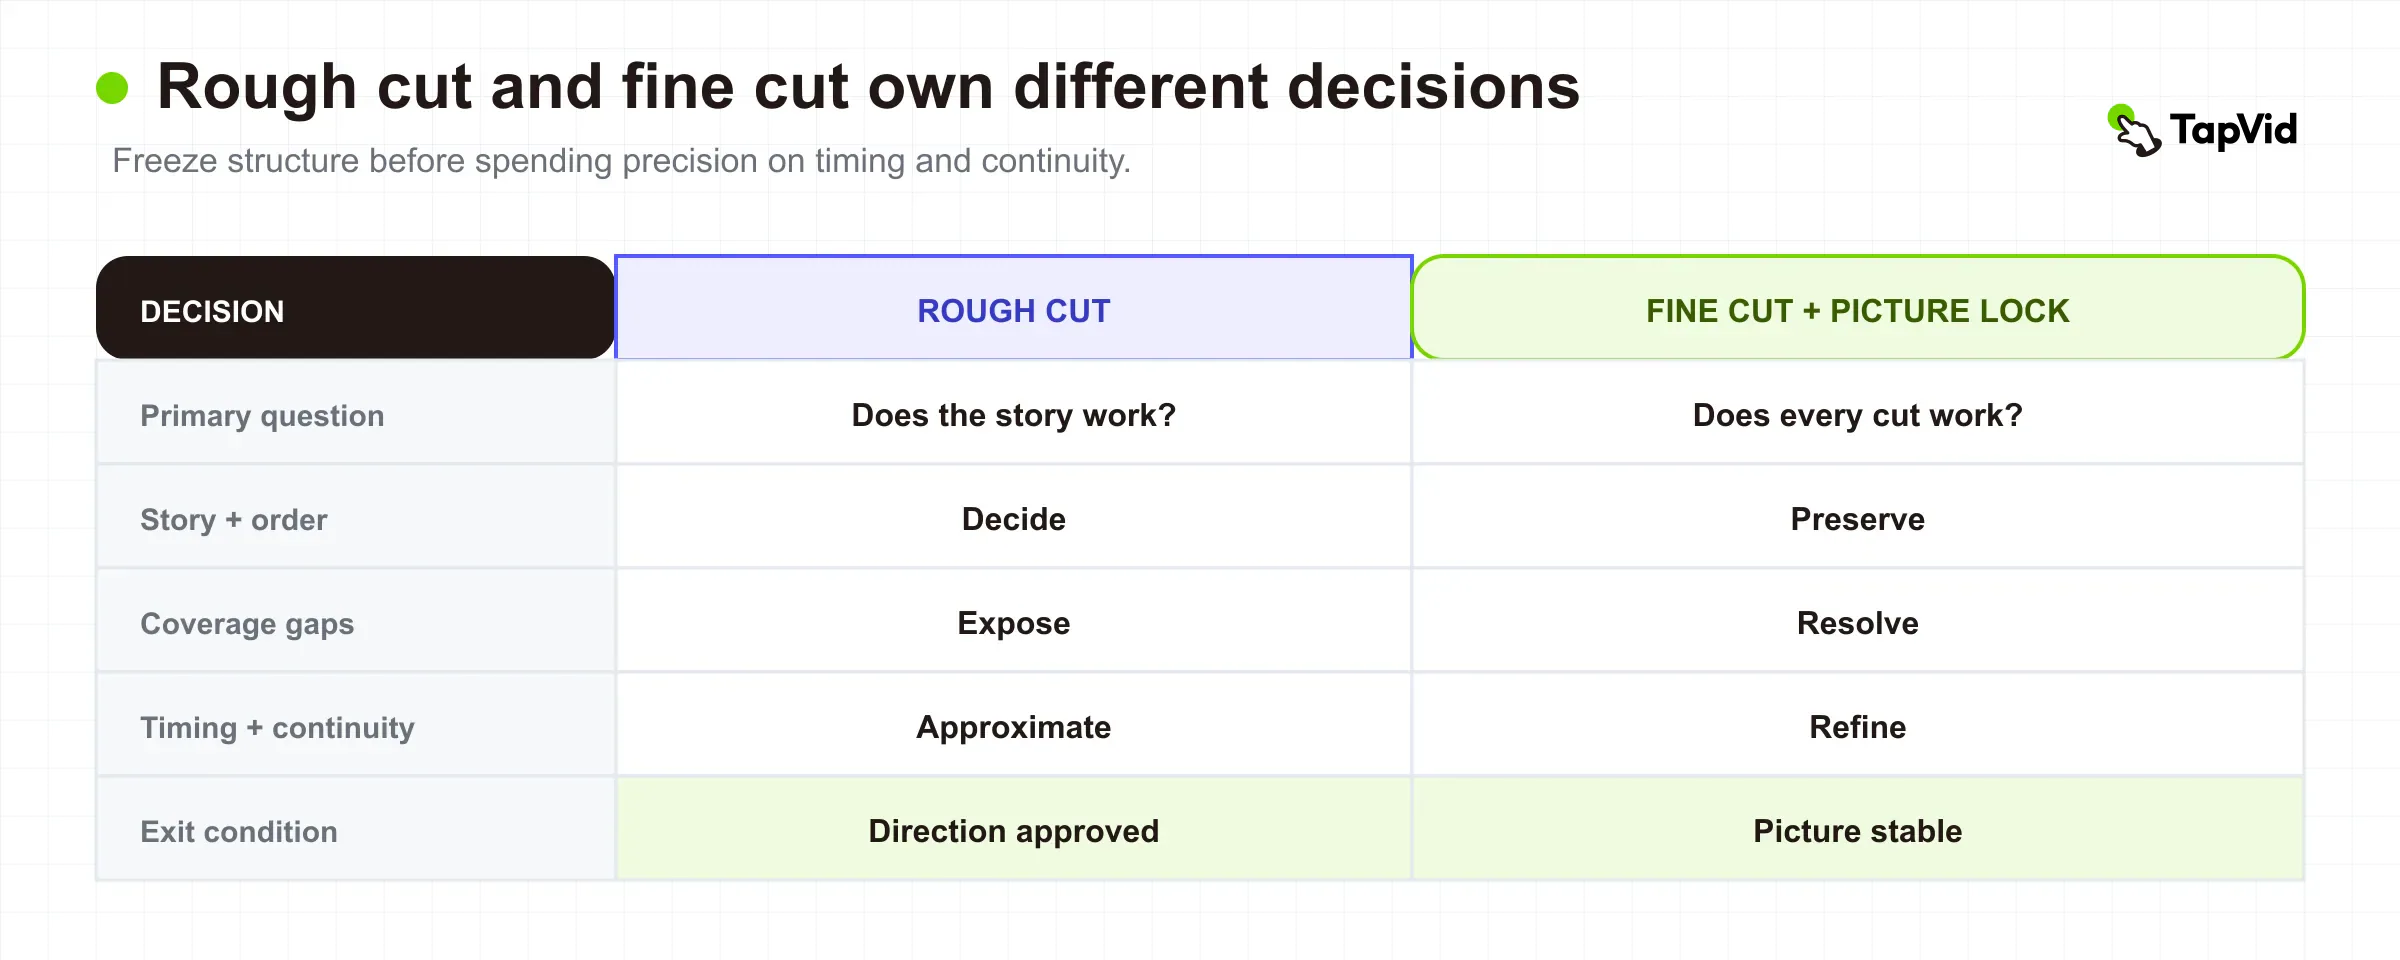
Fine cutting is where small timing changes compound. Removing twelve frames from an interview answer can shift captions, music edits, screen overlays, sound effects, and translated voice tracks. That is why picture lock matters. Picture lock does not mean a project can never change. It means downstream teams can work against a declared stable picture, and any later editorial change is recognized as rework with named consequences.
Run a pre-lock check before declaring the cut stable:
| Pre-lock check |
|---|
| confirm frame rate, sequence size, and intended aspect ratio; |
| remove accidental gaps, disabled clips, temporary slates, and offline media; |
| verify speed changes, freeze frames, and nested timelines; |
| confirm every required shot, disclaimer, and CTA is present; |
| identify handles or turnovers needed for sound, color, VFX, or graphics; |
| export a reference file with matching timecode or another stable locator. |
The fine-cut exit condition is not “the editor likes it.” It is an explicit decision that story, timing, shot order, and duration are stable enough for finishing. If several channel versions will branch from the master, define that branching separately in the video version control workflow instead of hiding it inside export filenames.
09
Finish audio before you chase cosmetic polish
Viewers will tolerate modest images longer than unintelligible dialogue. Start audio finishing with the elements that carry meaning: dialogue, narration, sync sound, and any necessary accessibility information. Repair obvious noise and clicks within realistic limits, choose the correct microphone or channel, and smooth edits with room tone where appropriate. Do not remove so much background that voices become metallic or detached from the scene.
Build the mix in layers. Establish dialogue first, then add effects and ambience that clarify action, then music that supports rather than masks the message. Check transitions into and out of music. Listen for clipped peaks, phase problems, sudden noise-floor changes, sibilance, plosives, and stereo elements that disappear in mono.
Measure loudness against the actual destination specification instead of copying a number from a random tutorial. EBU R 128, for example, is a broadcast-oriented recommendation that uses programme loudness, loudness range, and maximum true peak descriptors; its current recommendation is not a universal target for every social platform or client delivery (EBU R 128). Record the target used for the project and retain a mix with enough quality for future outputs.
| Playback path | What it tests |
|---|---|
| Monitors or headphones | Noise, clipping, edit quality, and balance |
| Laptop or phone | Speech translation on everyday playback |
| Mono | Compatibility and stereo elements that disappear |
The audio stage is complete when speech is intelligible, intentional sounds are present, loudness and peaks meet the chosen specification, and no element distracts from the message.
10
Correct color, then build a consistent grade
Color correction solves technical and continuity problems. Normalize camera sources, set exposure and white balance, match adjacent shots, manage color transforms, and protect important skin, product, or interface colors. Grading then creates the intended look within that controlled foundation. Combining those jobs mentally can make an attractive hero shot while neighboring shots still disagree.
Use calibrated or at least known monitoring conditions when color is important. Check scopes rather than relying only on a bright laptop display. Preserve highlight and shadow detail appropriate to the source and destination. If the project mixes camera footage with screen recordings and graphics, confirm that each element is interpreted in the correct color space.
Delivery changes the check. YouTube's current upload guidance, for example, recommends BT.709 for SDR uploads and explains how it interprets or converts unsupported or unspecified color information (YouTube recommended upload encoding settings). That does not make BT.709 the answer for every HDR, cinema, broadcast, or client master. It shows why the destination must be known before final color and export decisions are locked.
The color stage is complete when shots match, the look is intentional, scopes and monitoring reveal no unexplained clipping or gamut problem, and the exported color will be tagged for the chosen destination.
11
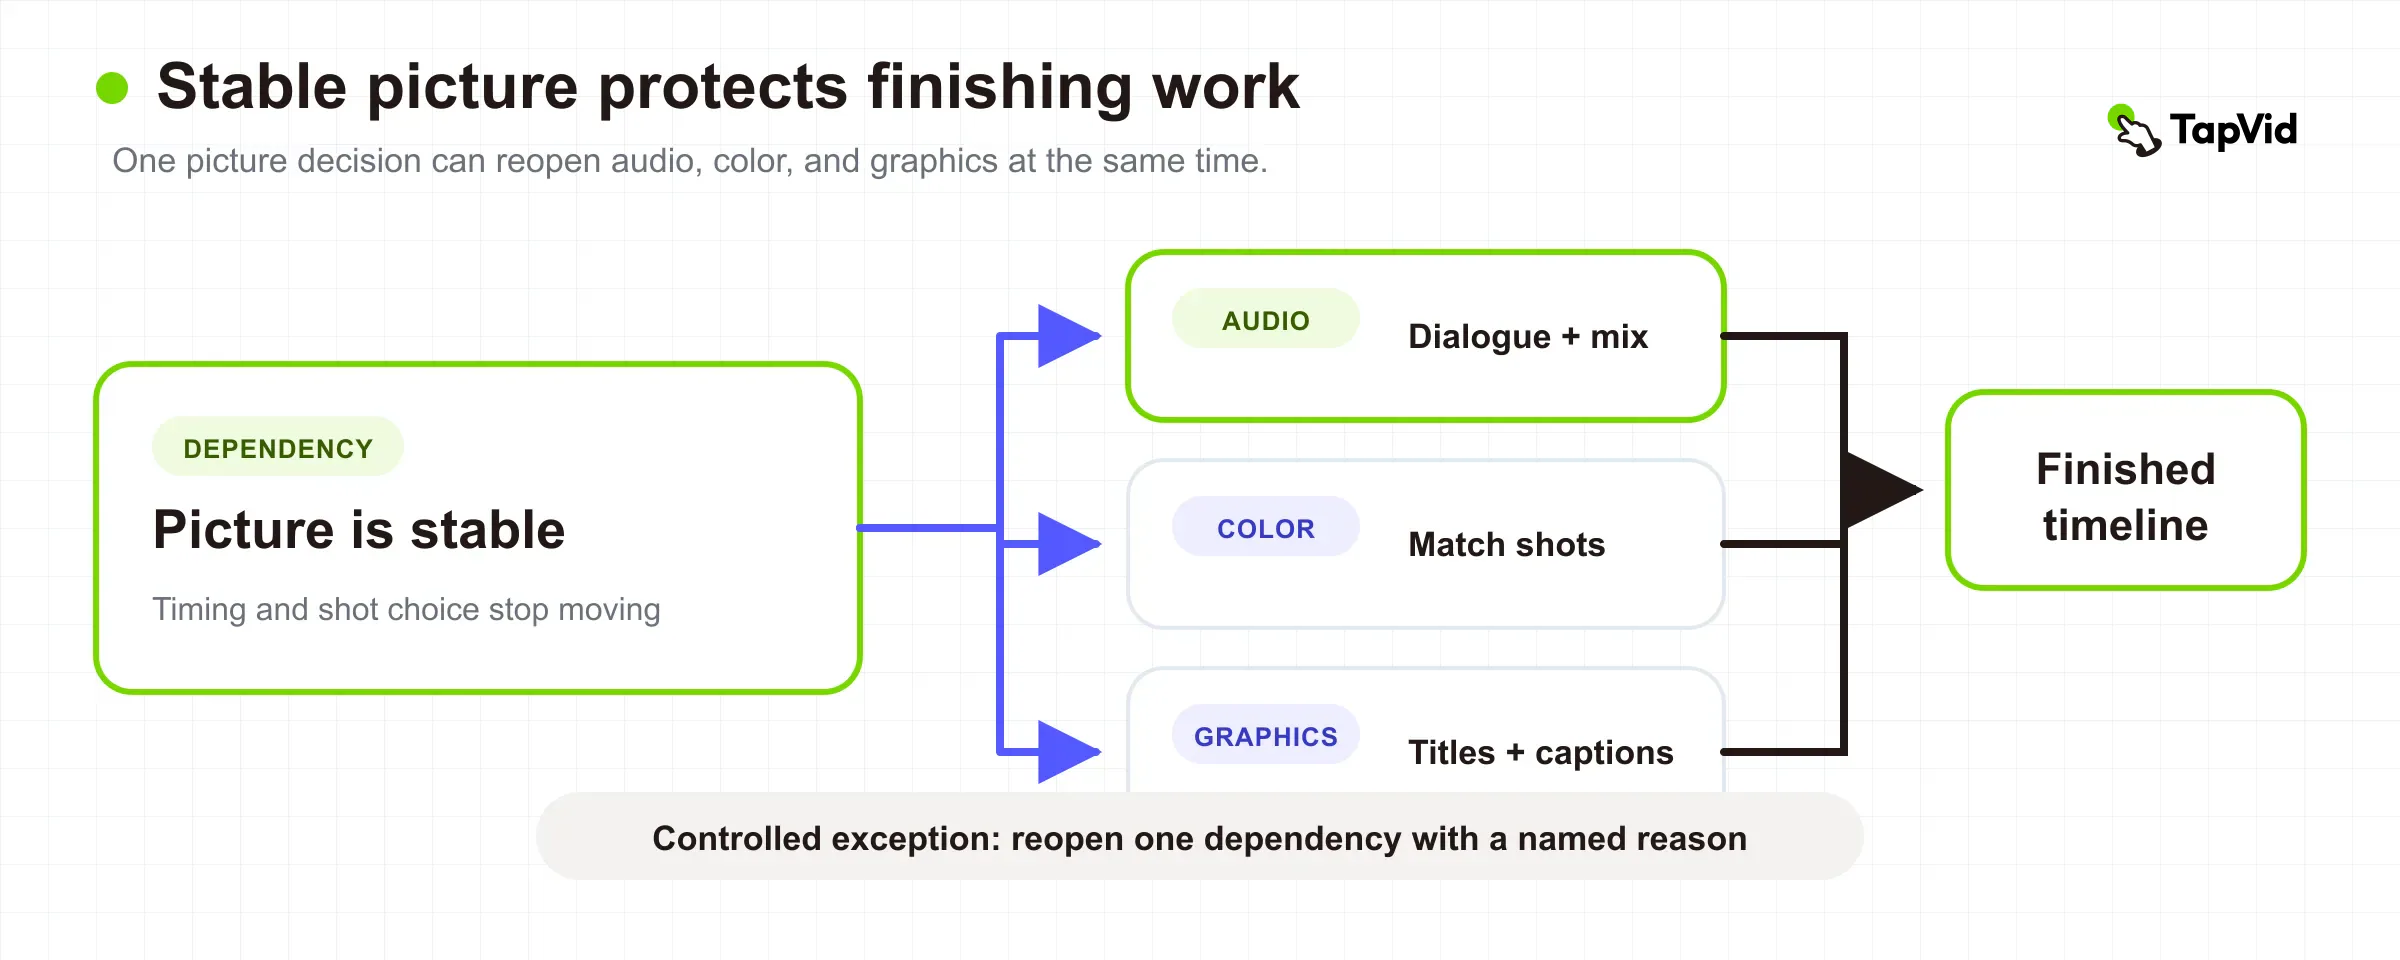
Add graphics only after timing and facts are stable
Add graphics only after timing and facts are stable
- Create a source sheet for names, roles, prices, dates, product terms, legal wording, and CTA copy.
- Copy from approved sources rather than retyping from memory.
- Test text at the smallest intended delivery size, not only on the editor's large monitor.
- Correct names, numbers, negations, speaker changes, and timing.
Graphics include titles, lower thirds, diagrams, callouts, screen annotations, captions, end cards, and branded overlays. They should communicate information the picture or audio cannot carry efficiently. Add them after timing and approved facts are stable enough to prevent repeated rebuilds.
Create a source sheet for names, roles, prices, dates, product terms, legal wording, and CTA copy. Copy from approved sources rather than retyping from memory. Check spelling, capitalization, pronunciation references, and safe-area requirements. Test text at the smallest intended delivery size, not only on the editor's large monitor.
Captions deserve their own accuracy and accessibility pass. W3C's explanation of WCAG 2.2 Success Criterion 1.2.2 says prerecorded synchronized media needs captions for its audio content, including dialogue and meaningful non-speech information, unless the video is clearly a media alternative for text (W3C WAI). Correct names, numbers, negations, speaker changes, and timing. Designed emphasis text can support a point, but it does not replace a complete caption track.
For talking-head footage, do not fill every empty part of the frame. Choose visual layers according to what the viewer needs to verify, organize, understand, or picture. The talking-head visual-layer editing guide covers that specialized decision in detail. This broader workflow only requires that graphics enter against stable timing, approved copy, and known caption space.
12
Run review without losing the edit
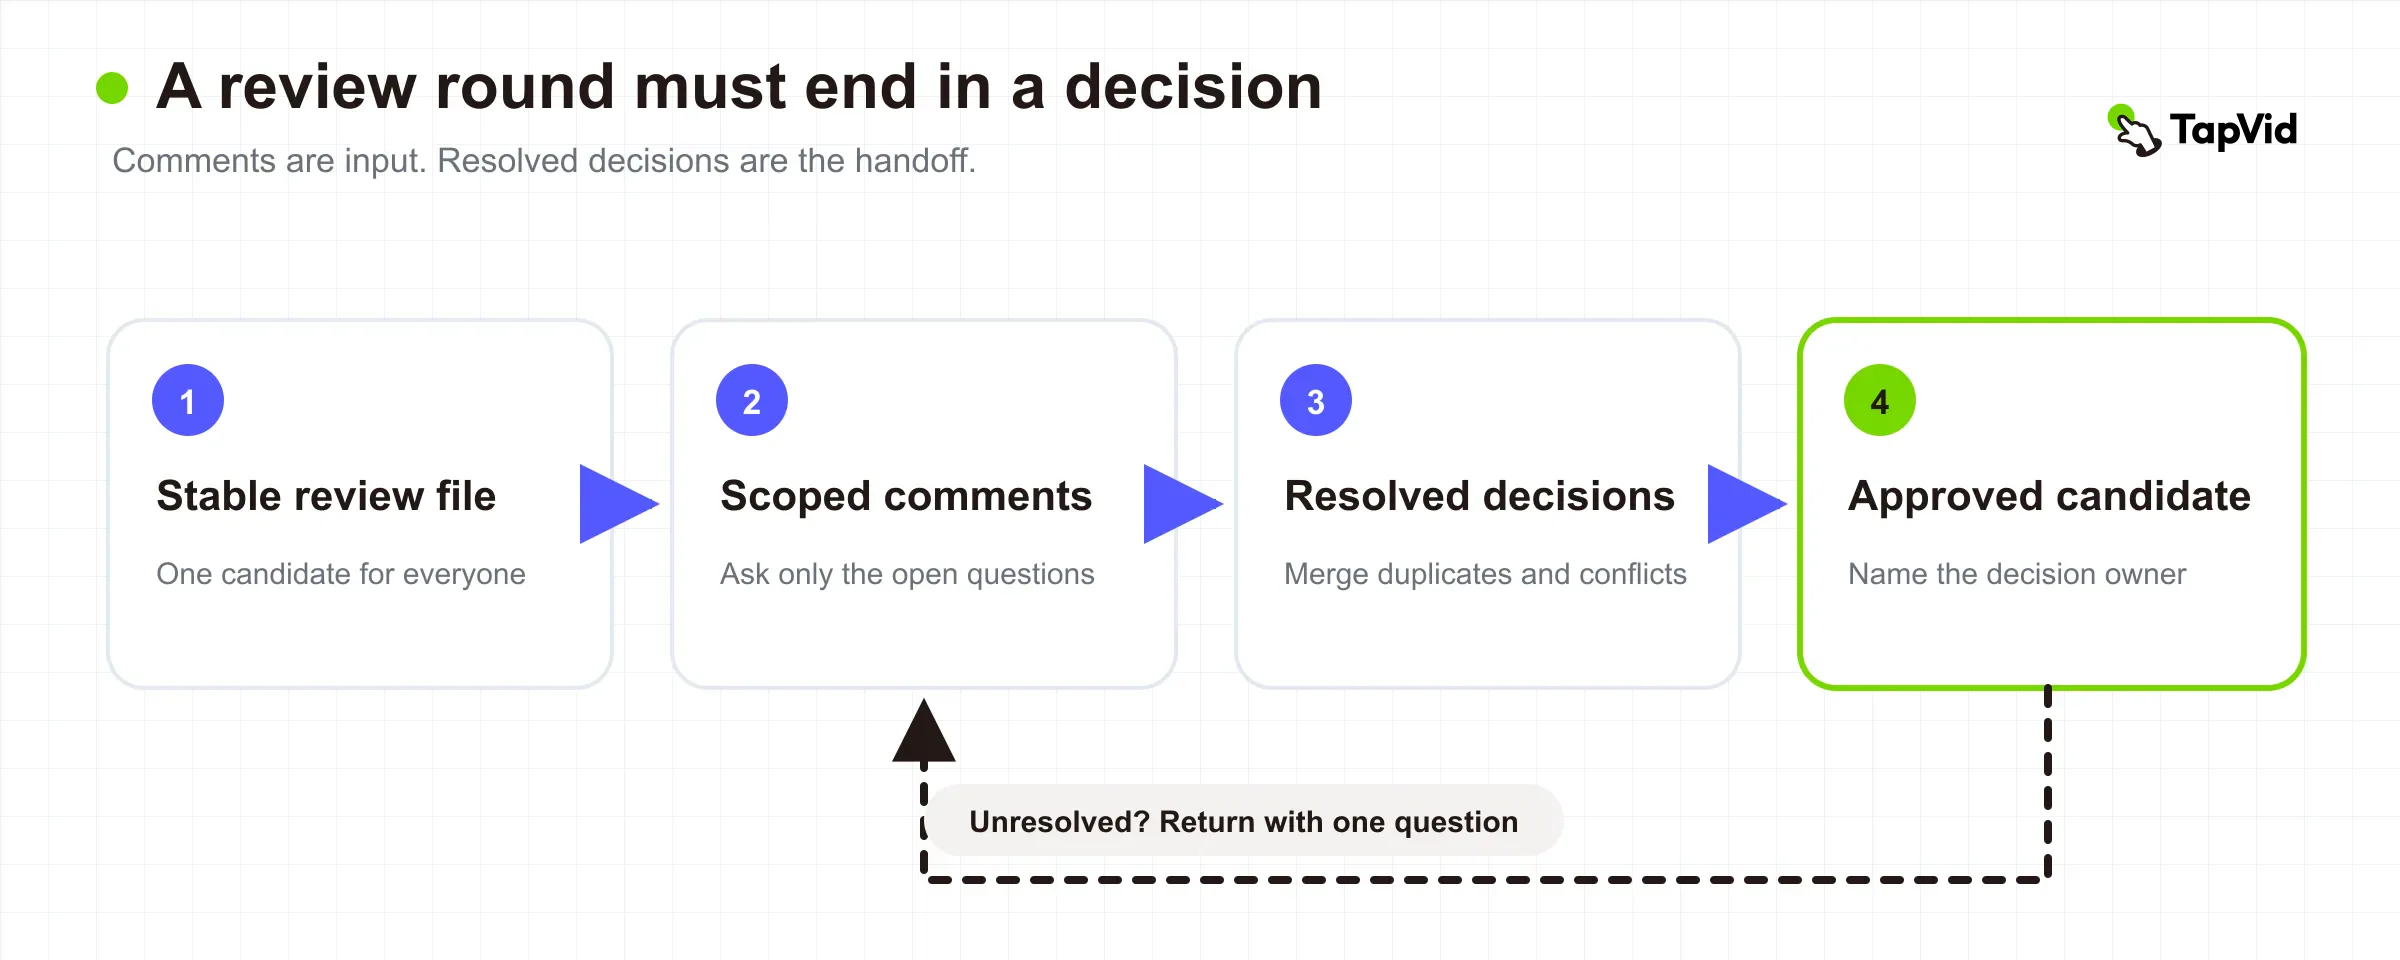
Review works when everyone comments on the same stable output and knows what kind of decision is being requested. Export or publish a review file with a clear identifier and time reference. State whether the round is for structure, factual accuracy, brand, legal, accessibility, technical finishing, or final approval. Asking every reviewer to assess everything at once produces contradictory notes and late surprises.
Collect comments in one review surface or decision log. Merge duplicates, separate preferences from corrections, and assign conflicting notes to a named decision owner. Convert accepted feedback into bounded actions. “Fix the title at 01:14” is testable. “Make it pop” requires clarification before it enters the edit.
After revisions, issue a new stable review candidate and summarize what changed, what stayed unchanged, and which questions remain open. Do not treat silence as approval. Preserve the approved candidate and its decision record long enough to support delivery and future recovery.
This section intentionally stops before defining version, revision, variant, branching, or rollback rules. Those are governance decisions, not merely review etiquette. Use the video version control guide when several deliverables, locales, aspect ratios, offers, or approval states must remain traceable. The official Frame.io overview below shows how a shared review surface keeps comments connected to a stable candidate.
The review stage is complete when required decision owners have resolved their scope, the candidate matches those decisions, and there is one clearly approved source for export.
13
Export for a known destination
Export is a translation from the approved timeline to a delivery file. Start with the destination specification: platform, resolution, aspect ratio, frame rate, codec, container, audio layout, captions, color space, maximum size, and naming requirements. Create separate outputs when destinations have genuinely different contracts instead of searching for one magical universal file.
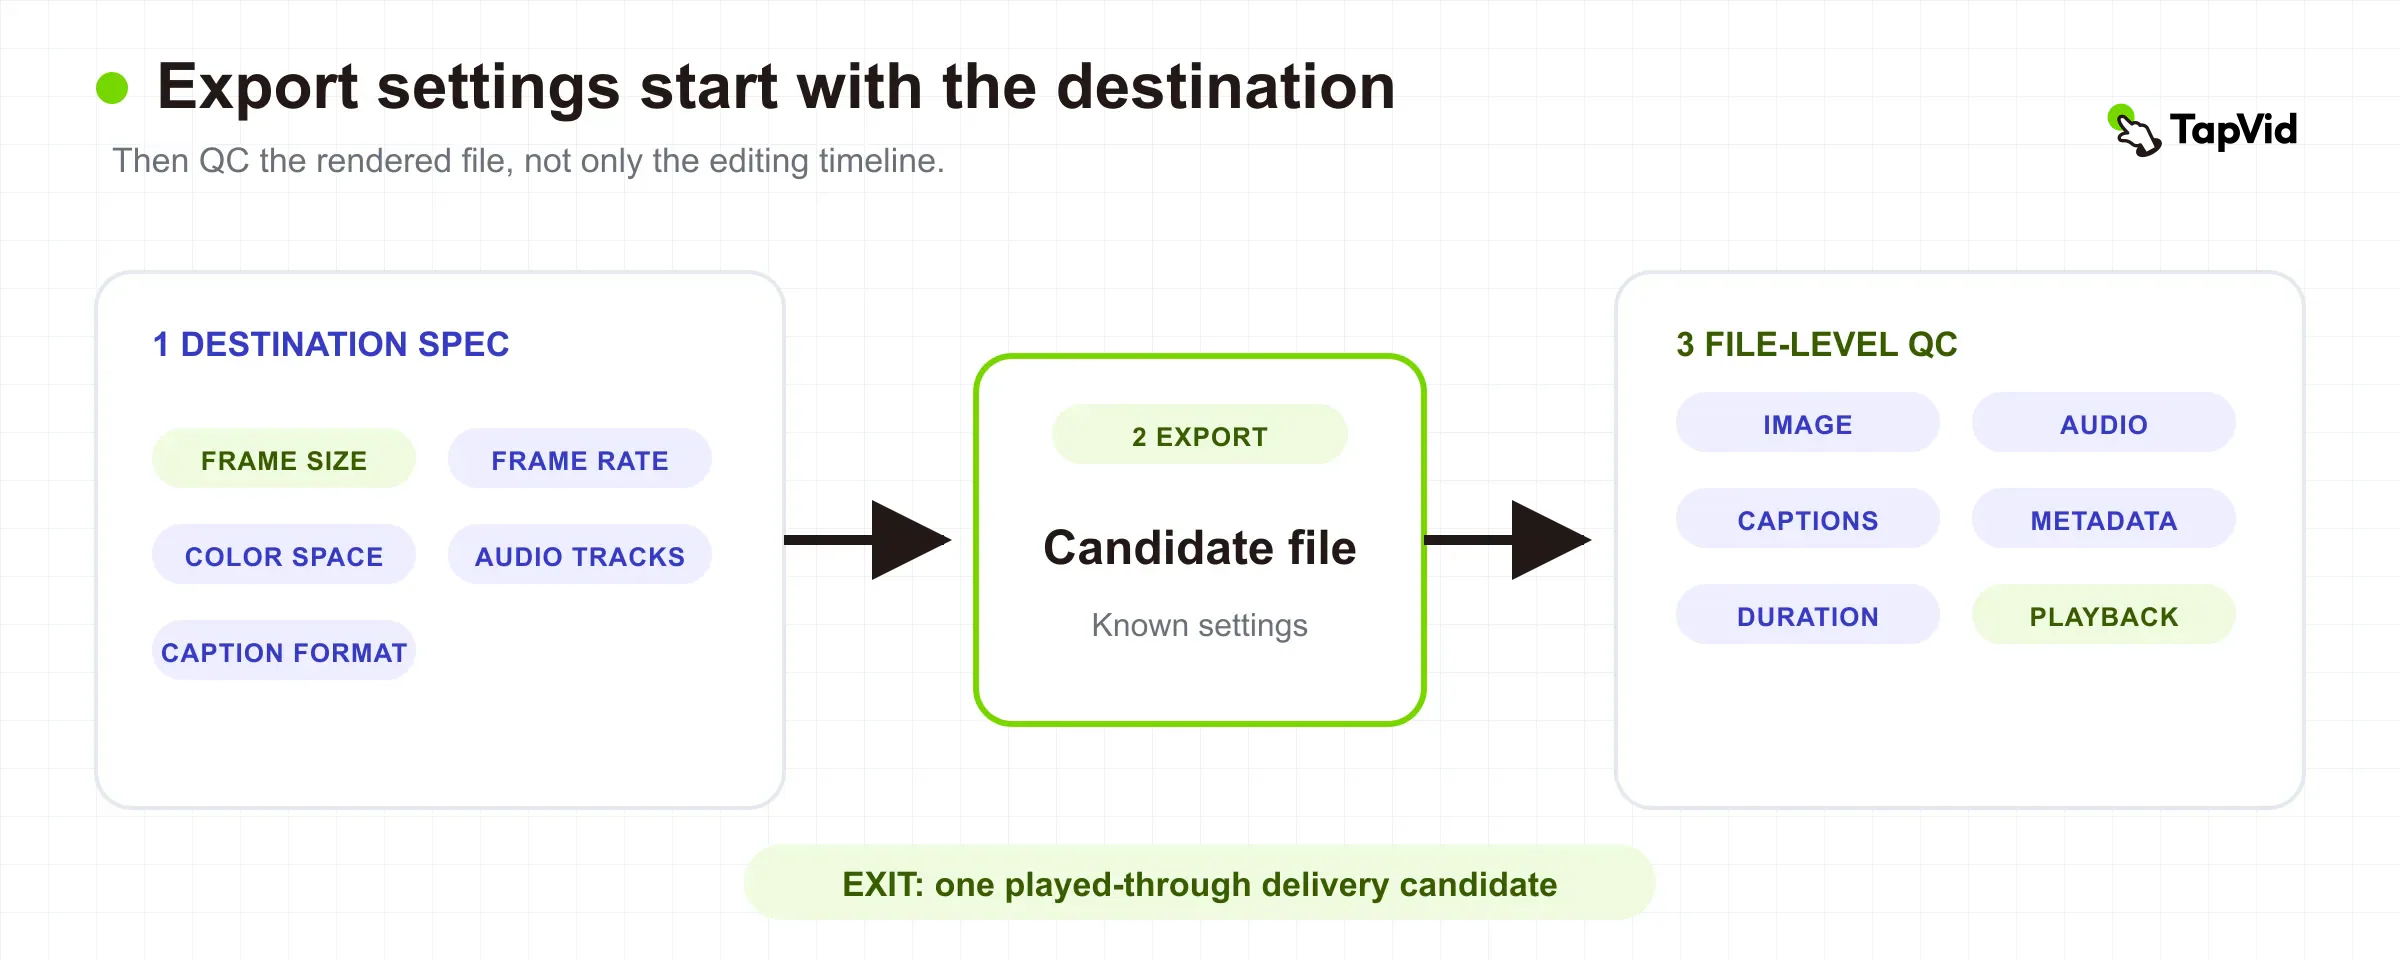
Use a high-quality master or mezzanine file when future versions, re-encoding, or archive value justify it. Create distribution copies from that master when practical. Preserve the source frame rate unless the destination requires a deliberate conversion. Confirm whether captions must be embedded, burned in, or delivered as sidecar files.
Official platform guidance changes, so read it at delivery time. YouTube currently recommends MP4 with H.264 video for common SDR uploads, matching the recorded frame rate, and provides resolution-specific bitrate guidance rather than one bitrate for every file (YouTube upload encoding settings). A broadcaster, ad platform, learning system, cinema package, or client portal may require something else.
Name the candidate so it can be tied to the approved review source and destination without relying on “final-final.” Export to a controlled folder, preserve the settings or preset used, and record any warning. Rendering completion moves the project into QC. It does not make the file deliverable by itself.
14
QC the file, not just the timeline
Quality control begins with the exported candidate file. Open it outside the editing application, preferably in more than one player or the actual destination preview when available. Watch from the first frame to the last. Scrubbing only the sections that changed can miss a muted track, a one-frame flash, a missing title, or a bad ending.
Run four passes when the risk supports them:
| QC pass | Checks |
|---|---|
| Picture pass | check framing, scaling, aspect ratio, black frames, dropped or repeated frames, color shifts, graphics, spelling, and end cards. |
| Audio pass | check sync, channel layout, dialogue, music, peaks, silence, and the beginning and end of fades. |
| Accessibility and text pass | check caption content, timing, line breaks, speaker labels, meaningful sound cues, language, and readability at target size. |
| File and destination pass | check duration, dimensions, frame rate, codec, container, file size, color tags, audio tracks, metadata, and successful processing after upload. |
Compare the candidate duration and key frames with the approved review output. Inspect any section that relied on proxies, speed changes, nested timelines, dynamic links, external renders, or relinked originals. If the platform transcodes the file, inspect the processed playback rather than assuming the uploaded master and public result are identical.
Record the QC result, tester, date, file identifier, destination, and any accepted limitation. Fixes create a new candidate that must be checked again in the affected areas and in any place the change could propagate. The QC exit condition is evidence that the actual delivery file, not the editor's timeline, satisfies the declared specification.
15
Archive for recovery and reuse
Backup protects active work from loss. Archive preserves a completed project's meaning and recoverability after active editing ends. The archive should answer what was delivered, which sources and decisions produced it, what can be reused, and how to reopen the project without depending on the original editor's memory.
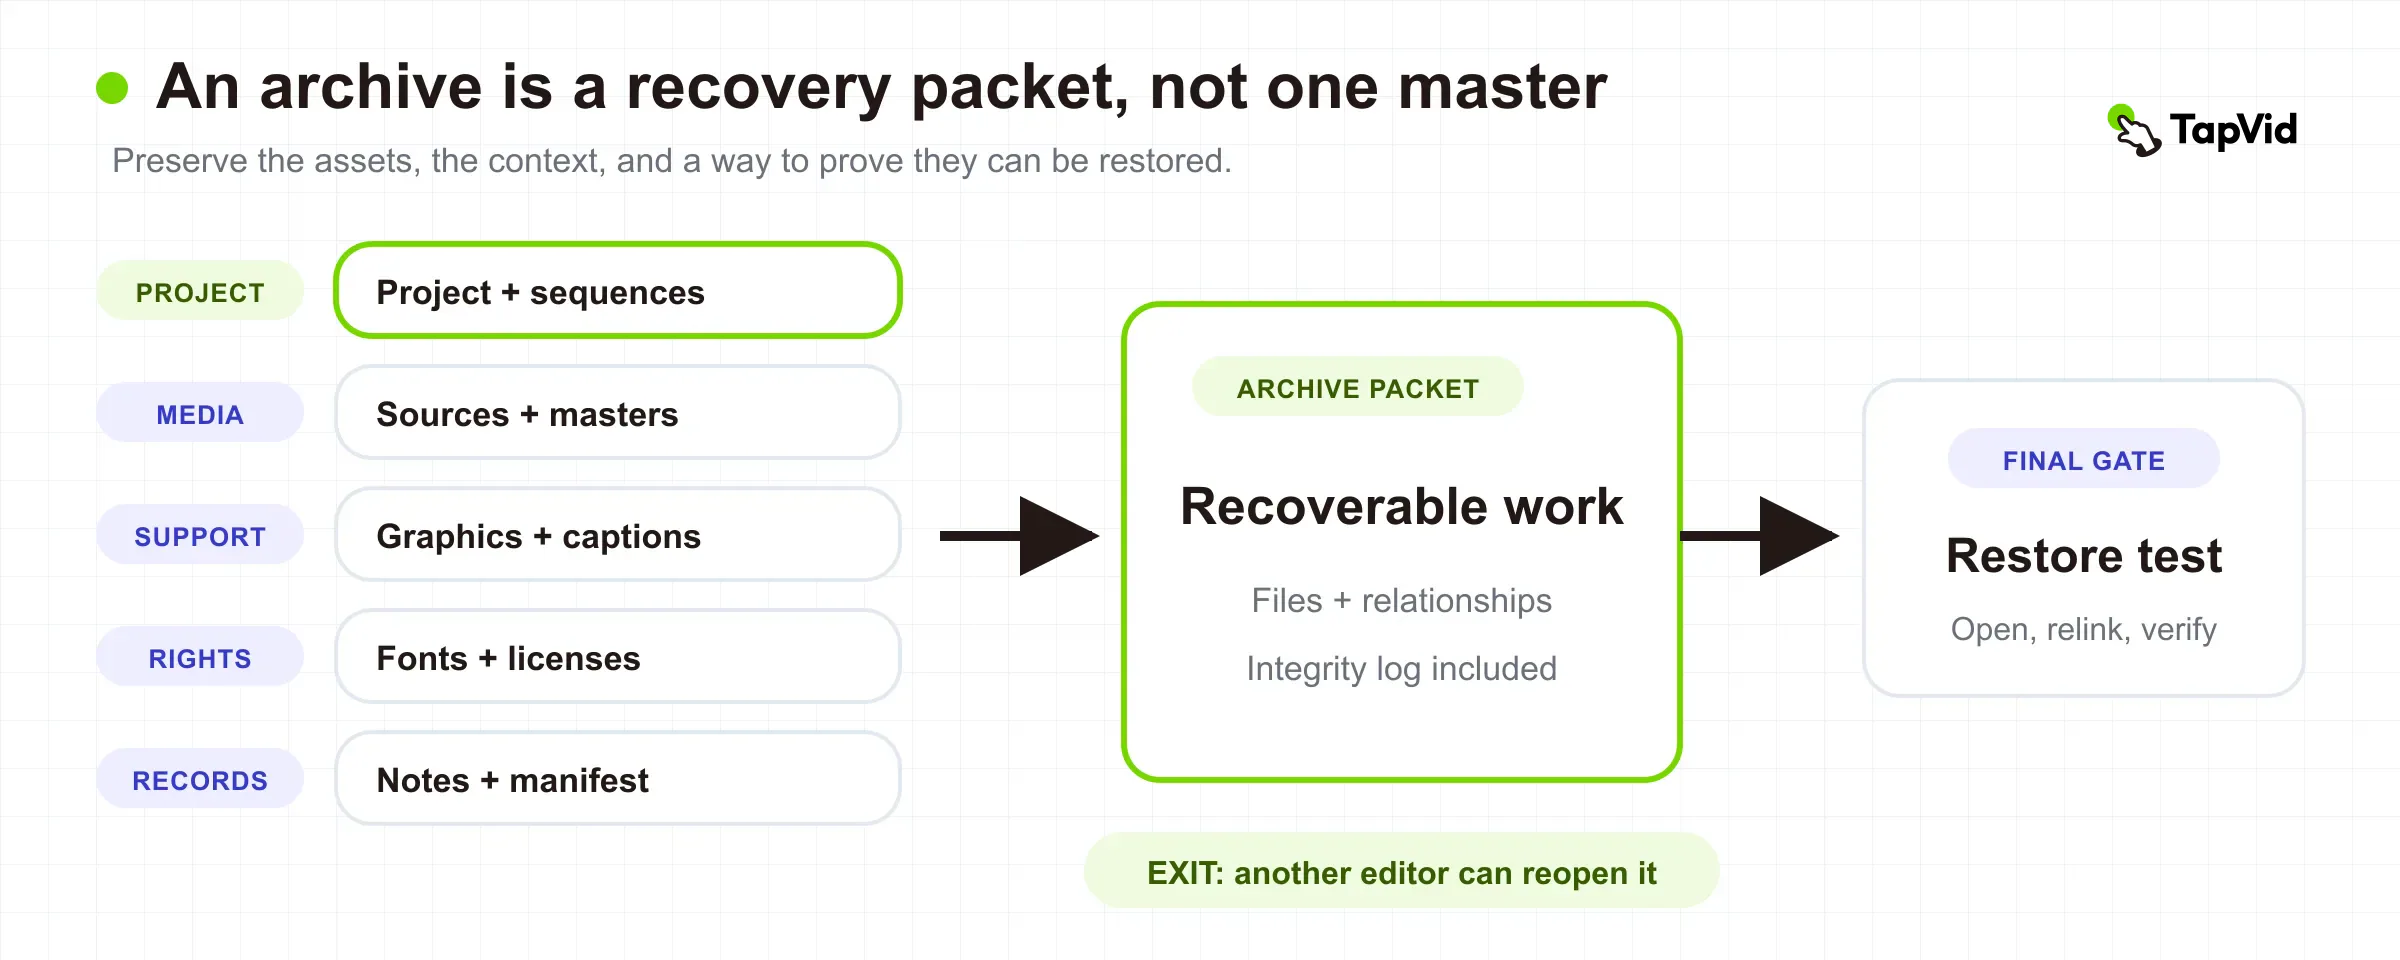
Preserve the approved master, required distribution files, project file or database, source-media index, graphics, captions, fonts and license records, audio stems when useful, final script, review or approval record, export specification, and a short restore note. Include application and plugin versions when compatibility risk matters. Decide whether caches, previews, proxies, and unused media are worth their storage cost. Do not delete irreplaceable originals merely because the timeline used only a small portion.
Create a manifest with file paths, sizes, and checksums for material whose integrity must be monitored. The Library of Congress describes recording and comparing fixity metadata as part of data-integrity management and retains logs of those checks as auditable records (Library of Congress data integrity management). A checksum cannot guarantee that future software can decode a file, but it can reveal that the stored bytes changed.
Store the archive in a system with defined retention, access, and migration responsibilities. Those rules depend on business, legal, privacy, and client obligations, so a generic editing guide should not invent a universal retention period. Schedule a restore test for high-value work. A future editor should be able to retrieve the project, verify the important files, open or migrate the timeline, and identify the released master.
The archive stage is complete when recovery has an owner, the package has enough context to be understood, important files can be verified, and the team knows when the archive will be checked or migrated. Storage without retrieval knowledge is only delayed loss.
16
Resolve common handoff decisions
What is a video editing workflow?
A video editing workflow is the ordered process that turns received media into a finished, verified, and recoverable video. A practical workflow defines the input, decision, exit condition, and remaining risks for every stage rather than listing software actions alone.
What are the main stages of video editing?
This guide uses 13 stages: ingest, backup, organization, proxies, rough cut, fine cut, audio, color, graphics, review, export, quality control, and archive. Some productions divide them further into VFX, conform, localization, accessibility, legal, sound mix, and specialist delivery turnovers.
Should I back up footage before or after ingest?
Verify the ingest into controlled storage, then create the independent copies required by the project's backup design before the source media is erased or returned. When risk is high, a verified copy tool can create multiple destinations during intake. Do not count an unverified transfer or a second folder on the same drive as a complete backup.
When should I create proxies?
Create proxies when original footage does not play or transfer efficiently enough for reliable editing. Keep each proxy attached to its full-resolution original, preserve essential identity such as timecode and frame rate, and switch back to originals for finishing unless the exact export workflow intentionally uses proxies.
What is the difference between a rough cut and a fine cut?
A rough cut decides story, order, coverage, and major omissions. A fine cut refines shot choice, timing, continuity, pacing, and picture stability. Polishing a fine cut before the rough-cut direction is approved creates avoidable rework.
Should audio, color, or graphics come first?
Picture should be stable before final audio, color, and graphics. Those finishing stages may overlap, but they share a dependency on timing. Audio often starts early with dialogue cleanup, while final music edits, color, titles, captions, and time-based graphics should be checked against the locked or explicitly stable picture.
What should a video export QC checklist include?
Check the rendered file's picture, audio, captions and text, duration, dimensions, frame rate, codec, container, color tags, channel layout, metadata, and destination playback. Watch the complete candidate outside the editing timeline and inspect the platform-processed result when the destination re-encodes it.
What files should be archived after a video project?
Preserve the approved master, project, source index, essential source media, graphics, captions, audio deliverables, script, licenses, approval record, export settings, manifest, and restore notes. Keep enough context for another editor to verify and reopen the work. Retention and deletion periods must follow the project's legal, privacy, security, and client requirements.
17
Make every handoff earn the next stage
The fastest workflow is not the one with the fewest named steps. It is the one that catches a problem while the responsible decision is still cheap to change. Verified ingest prevents mystery corruption. Backup prevents a hardware failure from ending the project. Rough-cut approval prevents color and graphics work on a broken structure. File-level QC prevents a correct timeline from becoming a defective delivery. Archive recovery prevents next year's update from becoming a reconstruction exercise.
Start with the 13-stage table and adapt it to the actual risk. A solo editor can own every row. A post-production team can assign a different owner to each handoff. In either case, define what enters, what changes, what proves completion, and what remains open. That discipline turns video editing from a chain of personal habits into a process another person can review, repeat, and recover.