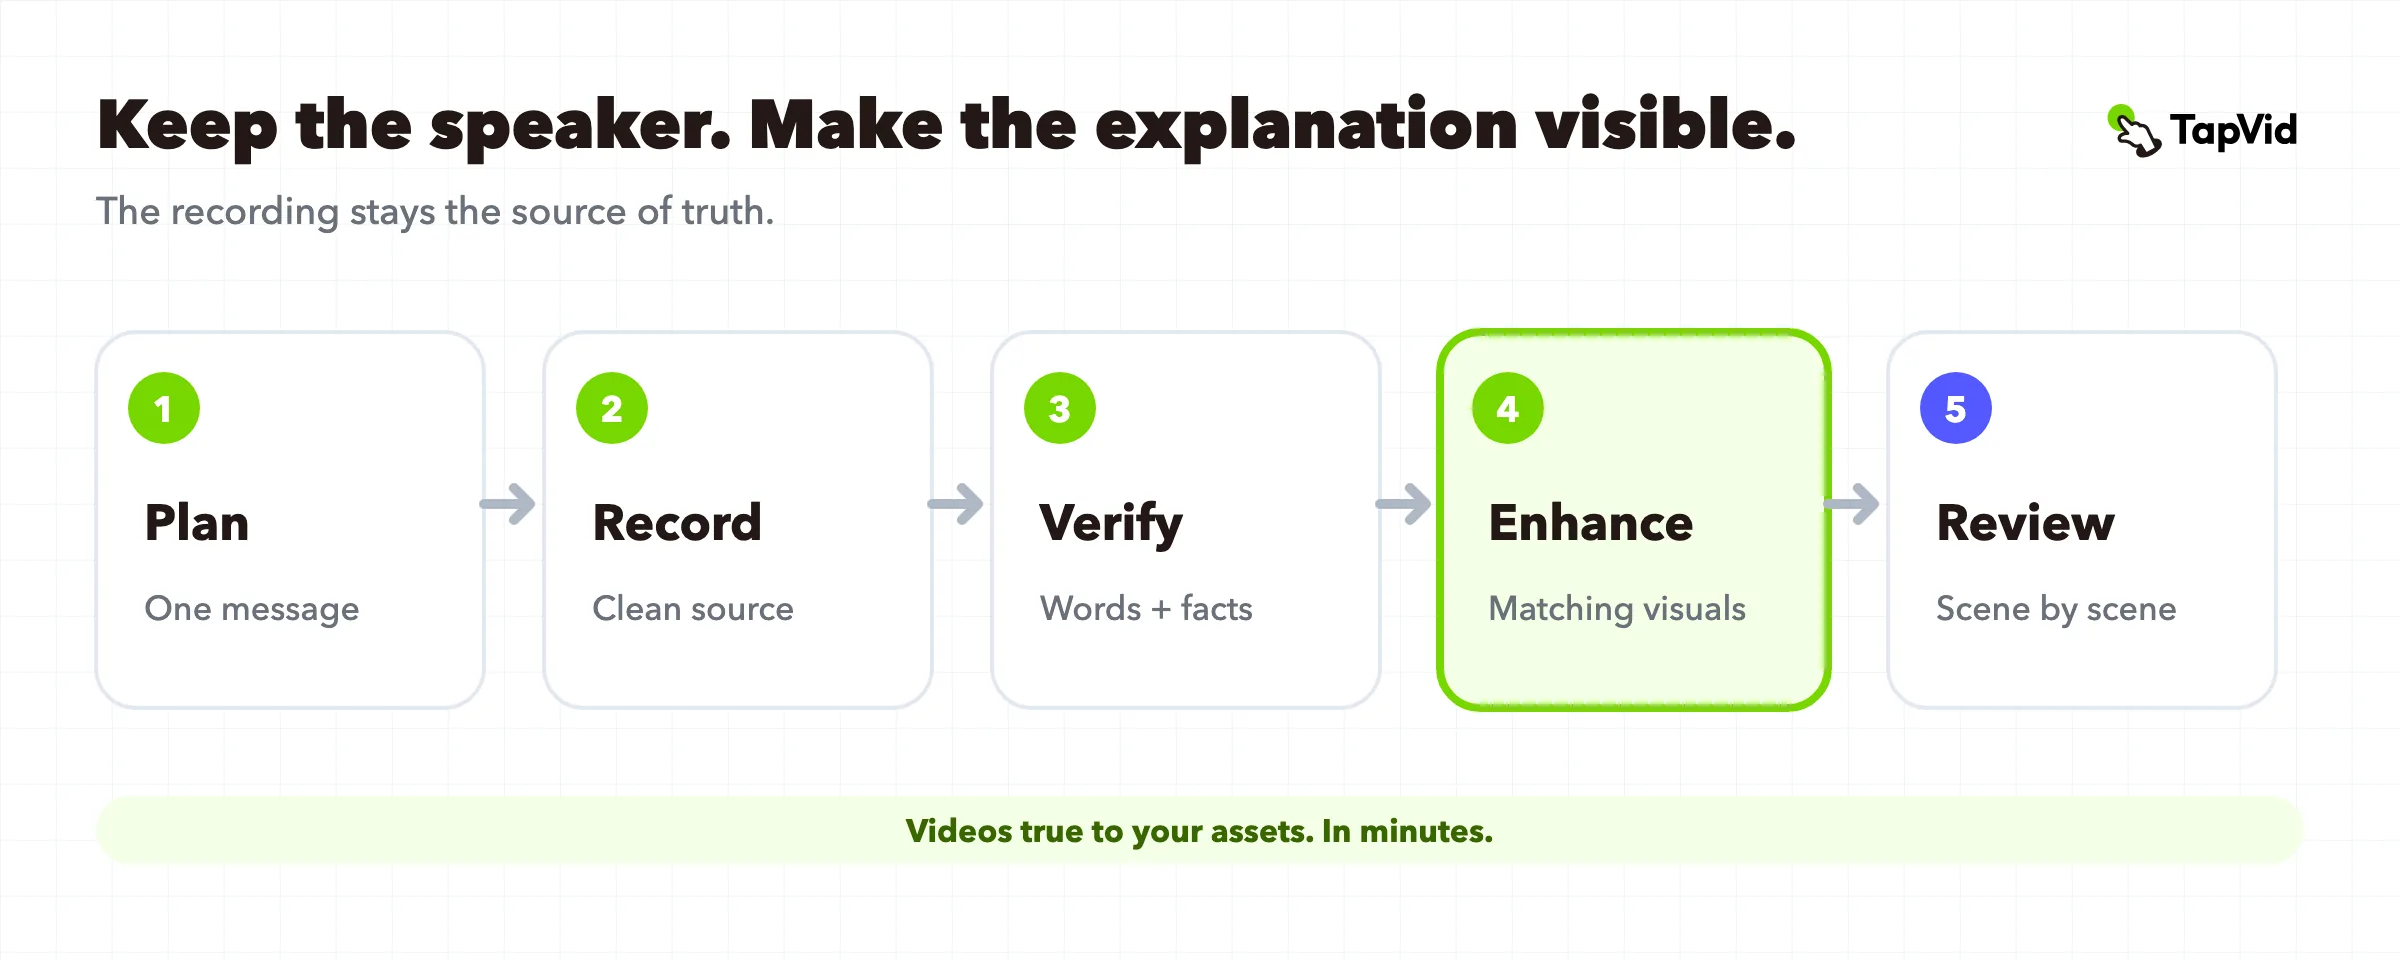

A finished talking head video should preserve the speaker's original performance and supplied information accurately, then make the message easier to verify and follow. A clean face and clear voice are the source. The finished explanation may also need the exact number being discussed, the product screen being described, or a visible sequence that appears at the right moment.
This guide shows how to make a talking head video from start to finish: plan one message, record a usable source clip, then turn that recording into a visual explainer. TapVid is an Explainer Video Engine for the enhancement stage. It keeps the recorded speaker at the center and adds reviewable captions, diagrams, callouts, layouts, and supporting visuals around the original delivery.
If you need a definition before starting, read What Is a Talking Head Video?. If you already have a recording and want a deeper framework for choosing visuals sentence by sentence, use the visual-layer editing guide.
Enhance a talking-head recording with TapVid
01
The short answer: how to make a talking head video
Use a two-stage workflow. First, capture a source clip that preserves the message and the speaker. Second, add only the visual information the face cannot communicate by itself.
- Choose one viewer and one outcome.
- Write for speech and mark facts that may need visual evidence.
- Record a stable, well-lit source clip with clear audio and an unobstructed face.
- Keep a clean master without burned-in captions, filters, or irreversible effects.
- Upload the recording and review the transcript.
- Map numbers, steps, comparisons, and concrete references to the smallest useful visual.
- Review every caption, visual, and source-to-script match before export.
- Refine only the scenes that need correction, then export for the intended destination.
The important boundary is simple: recording creates the trusted source; enhancement makes that source easier to understand. A better camera cannot rescue an unclear argument, and decorative motion cannot rescue a visual that shows the wrong fact.
02
What the raw recording becomes
A raw talking-head clip asks one visual, the speaker's face, to carry tone, facts, structure, examples, and context at the same time. That can work for a personal story or opinion. It becomes harder to follow when the speaker introduces a number, a multi-step process, a product screen, or a comparison the viewer needs to inspect.
The official comparison below uses the same 28.9-second, 720 x 1280 source recording before and after TapVid enhancement.
Before: raw recording. The presenter fills the frame, but the spoken sequence has no supporting visual layer.
After: TapVid enhancement. The presenter remains visible while captions, a timeline, and picture-in-picture layouts make the sequence visible.
The public comparison files contain no audio stream. They demonstrate the visual transformation, not voice fidelity or audio repair. Open the live before-and-after comparison.
03
Why TapVid for talking-head enhancement
TapVid's advantage is not simply adding more effects. It keeps the original performance as the source of truth, then makes the facts around that performance visible and reviewable. The speaker's face, voice, wording, and order remain the foundation. Captions, diagrams, callouts, data visuals, and layouts are added to the beats they explain.
| Workflow | Source of truth | What changes | What the reviewer inspects |
|---|---|---|---|
| Manual timeline editing | The original recording | An editor builds and times each visual layer | The full timeline, graphics, and export |
| AI avatar generation | A script, avatar, and voice settings | The presenter performance is generated | The generated delivery and visuals |
| TapVid enhancement | The existing recording plus approved wording and assets | Supporting visuals are synchronized around the real speaker | The transcript, scenes, captions, graphics, and source-to-script match |
This difference matters when the speaker has already recorded a credible explanation. Compared with building every overlay on a timeline, TapVid generates the first visual pass from the spoken structure and supplied assets. Compared with avatar generation, it does not recreate the presenter. Revisions can target a selected scene or element while the spoken message and supplied information remain available for review before export.
Case evidence: edit one scene without replacing the presenter
In the *How Much Time Do You Really Have?* project, the TapVid Studio history records targeted changes to individual elements: widening the text plate for "DEPRESSING?", shifting the "LIBERATING." panel, and moving the opening title while changing its fade timing. The presenter and the overall video structure stay in place.
TapVid Studio evidence. The finished scene remains visible beside the change history, so a reviewer can trace what was adjusted.
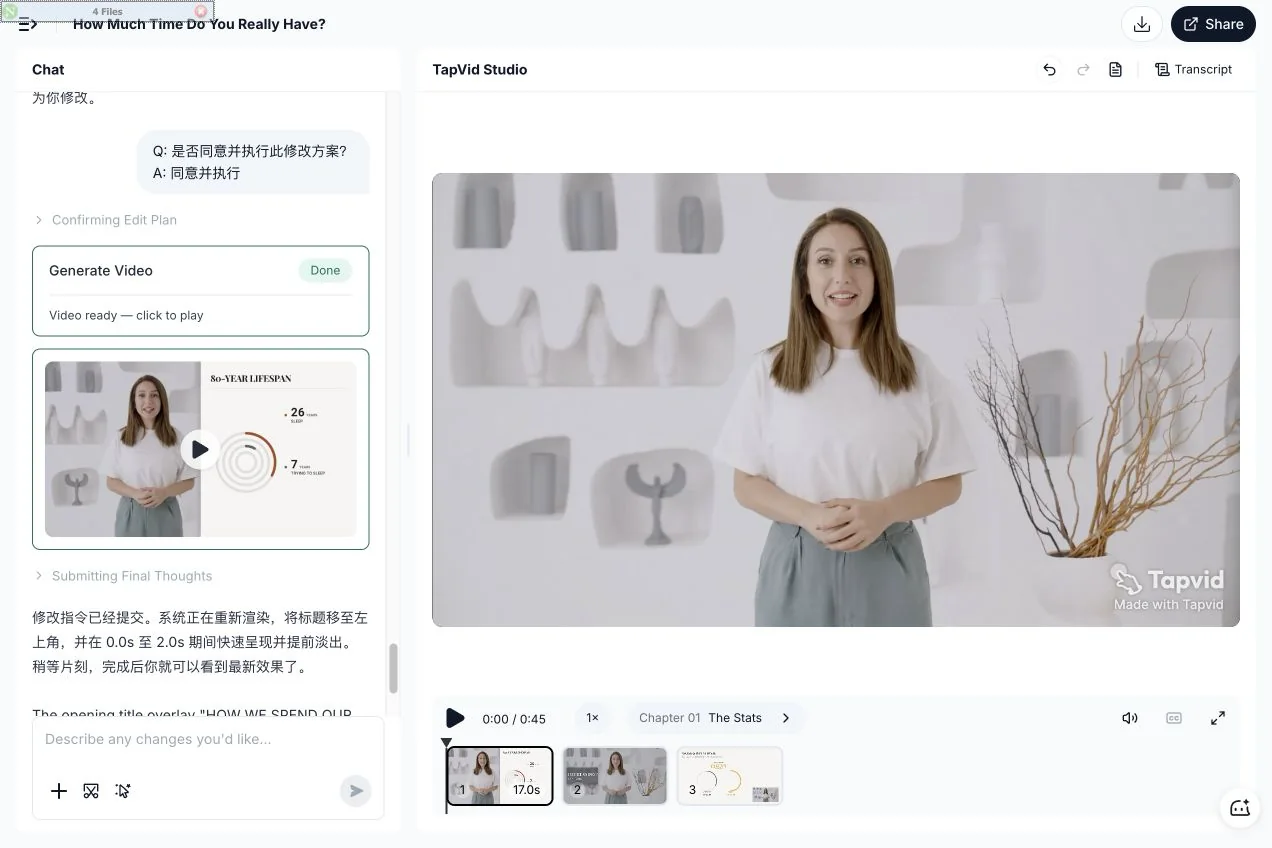
Case recording. The 44.5-second output keeps the real presenter visible while charts, text, split layouts, diagrams, and picture-in-picture scenes change around her.
This case proves the visible enhancement result and the scene-level correction path shown in TapVid Studio. It does not establish audience retention, conversion lift, or a universal processing time. Watch the public case. Open the TapVid project (sign-in may be required).
04
1. Plan one message and its evidence
Write one sentence before you write the script:
> After watching, [specific viewer] should be able to [specific action or decision].
"Explain our product" is too broad. "Help a new customer choose between the Basic and Pro plans" gives the speaker a clear job. It also reveals which facts cannot be left to memory. Plan names, limits, prices, interface states, and quoted wording may need to appear on screen exactly as supplied.
Write for the mouth, not the page. Read every line aloud. Shorten sentences that require a second breath, replace formal transitions with the speaker's normal language, and divide the message into short modules. A useful spoken structure is a hook, a promise, two or three ordered points, and one next action. Wistia likewise recommends a conversational tone and a small number of talking points for subject-matter experts (Wistia).
While drafting, mark four kinds of information that may need a visual later:
| Spoken signal | Viewer needs to see | Likely visual |
|---|---|---|
| Number, date, price, or percentage | The exact value or difference | Callout or compact chart |
| List, sequence, or framework | The order and grouping | Steps, cards, or labeled layout |
| Cause, flow, dependency, or contrast | How the parts connect | Diagram or side-by-side comparison |
| Product, screen, place, object, or action | What the reference actually looks like | Supplied asset, screen capture, or relevant footage |
Do not turn every sentence into an effect cue. Personal statements, transitions, and emotional moments may be strongest when the viewer can simply watch the speaker. Mark a visual only when it verifies, organizes, explains, or shows something the face alone cannot.
05
2. Record a source clip that leaves room for explanation
A phone, webcam, or camera can produce a usable source clip. The goal is not a cinema setup. The goal is a stable file in which the face, voice, and intended crop remain usable after visual layers are added.
Decide four things before recording: whether the speaker addresses the lens or an interviewer, whether the main delivery is 16:9 or 9:16, which statements will need product screens or graphics, and where one module can end cleanly before the next begins. If both horizontal and vertical versions matter, use a wider source and keep the speaker near the center. Do not assume a tight horizontal close-up can be cropped into a clean vertical version later.
Frame the speaker from roughly mid-chest upward, keep the lens near eye level, stabilize the camera, and prevent focus or exposure from changing during the take. Leave intentional negative space only when it has a job, such as holding a product screen, number, or short label. Random empty space does not make a frame enhancement-ready.
Audio matters more than a camera upgrade. Move the microphone close enough that every word is intelligible. Shure's spoken-word guidance uses roughly 6 to 12 inches as a starting range and recommends a slightly off-axis position to reduce plosives (Shure). Test the microphone you actually have, listen to the recorded file through headphones, and fix traffic, clipping, echo, or clothing rub before the full take.
Use one controllable light first. A large soft source in front of the speaker and slightly to one side is a practical baseline. Check that both eyes remain visible, bright areas retain skin detail, shadows are readable, and the color does not shift when the speaker gestures.
Reference clip: a source frame that leaves the face usable
The reference clip keeps the camera stable, the eyes near the upper third, the face unobstructed, and the background separated. The stock file has no audio stream, so it supports a framing judgment only.
Licensed source: Mixkit item 41272 · Mixkit Stock Video Free License
06
3. Test and preserve the clean master
Record a 30-second test with the loudest line, the largest gesture, and the normal speaking position. Review the saved file at full screen with headphones. Do not approve the setup from the live preview.
| Check | Pass condition | Why enhancement needs it |
|---|---|---|
| Message | The opening sentence names the viewer's problem or decision. | Visual layers cannot repair a missing argument. |
| Face | The eyes stay sharp and gestures do not cover the face. | The speaker remains the trust anchor. |
| Audio | Every word is clear, with no clipping, hum, echo, or fabric rub. | The transcript and timing depend on intelligible speech. |
| Light | Skin detail remains visible throughout the gesture range. | Added layouts should not have to hide a damaged image. |
| Crop | The target crop preserves the face, hands, and planned visual area. | Overlays need space without blocking the speaker. |
Fix one failure at a time, then record another short test. Step back if a hand crosses the face. Move the microphone closer if the voice sounds distant. Lock exposure if brightness changes during gestures. Recenter the speaker if the vertical crop removes the head, hands, or planned overlay area.
Failure clip: why the saved file must pass the gate
In this clip, a foreground hand repeatedly covers the face, and file inspection found no audio stream. It looks like a talking-head shot in a gallery, but it cannot function as a trustworthy source recording. Enhancement should not be used to conceal a failure that needs a reshoot.
Licensed source: Mixkit item 41290 · Mixkit Stock Video Free License
Once the test passes, record in short modules. Hold still briefly before and after each take, restart from the beginning of a sentence after a mistake, and record a pickup immediately when a factual statement is wrong. Keep the original camera and audio files. Do not burn captions, beauty filters, heavy noise reduction, or a color look into the only master.
07
4. Upload the recording and verify the transcript
Upload the selected talking-head clip to TapVid's talking-head workflow. The current product page describes a three-part flow: upload the recording, review the script and proposed visuals, then refine individual shots before export.
Product page evidence. The public talking-head page lists the same three steps: upload the recording, review the script, then refine and export.
Start with the transcript because it is the reference for everything that follows. Correct names, product terms, numbers, dates, prices, and negations. A wrong transcript can create a polished but incorrect callout. If the speaker said "does not include," losing the word "not" changes the claim, not merely the caption.
Keep the supplied script, original recording, and approved product assets as the source of truth. TapVid can organize the recording into chapters and propose supporting visuals, but the reviewer still needs to check what each scene says and shows before delivery.
08
5. Turn spoken beats into reviewable visuals
Work through the transcript and select only the beats that create a real visual question. For each selected beat, write down the spoken line, what the viewer needs to understand, the minimum visual signal, and when the scene should return to the speaker.
Use the smallest visual that completes the job. A number may need one readable callout, not a full dashboard. A three-part sequence may need three labeled cards in the same order. A causal claim may need a simple diagram. A product reference should use the actual product image, interface, or supplied footage rather than a generic substitute.
TapVid's current talking-head workflow can add captions, diagrams, callouts, split-screen arrangements, picture-in-picture scenes, and supporting visuals around the source recording. The original speaker remains the center of the message. The visual layer should enter when the relevant phrase begins, remain long enough to inspect, and leave when the narration moves on.
Do not add motion on a timer. A personal opinion may stay on the face for an extended passage. A pricing comparison may require a longer hold so the viewer can inspect exact values. A product demonstration may temporarily make the interface primary while keeping the speaker visible in a smaller frame.
09
6. Enhance the explanation without replacing the speaker
The product decision is not "human or visuals." A strong talking-head video uses the person for trust, delivery, and nuance, then uses graphics and supplied assets for information that should be seen rather than remembered.
For an existing product talk, training lesson, founder update, or expert explanation, TapVid keeps the source face, voice, wording, and order, then adds synchronized visual layers around that delivery. It is not an avatar replacement workflow. The person you recorded remains the presenter.
This distinction also sets a useful boundary. TapVid does not replace the need to select a coherent take, repair unusable audio, correct severe exposure problems, or perform specialized color grading. Complete those source-editing tasks before enhancement. Use TapVid for the explanatory layer: captions, exact callouts, diagrams, supplied product material, and scene layouts that follow the approved message.
After the first pass, refine the scene that failed rather than treating the entire video as one irreversible render. Fix a caption, swap the wrong visual, simplify a crowded diagram, or change the layout where it covers the face. Leave unaffected scenes alone.
If no one can appear on camera at all, read the section on AI avatar presenters below before you add a synthetic face.
10
7. Review accuracy before export
A polished frame is not automatically a correct frame. Review the enhanced video against three separate accuracy questions:
| Accuracy layer | What to verify | Typical failure |
|---|---|---|
| Asset fidelity | The supplied product image, logo, interface, or source footage remains the intended asset. | A generic or redrawn substitute appears instead. |
| Information fidelity | Names, numbers, prices, parameters, and approved wording match the source exactly. | A caption, label, or chart changes the meaning. |
| Correct correspondence | Each visual appears with the sentence and product it is meant to explain. | The right asset appears at the wrong line, or product A is paired with product B. |
Run three review passes. First, watch with sound and check timing. Second, mute the video and inspect whether every added visual makes a supported claim. Third, watch at the smallest intended size and check caption, number, diagram, and interface legibility.
Do not describe the workflow as infallible. The practical standard is that every visible claim can be traced to the approved recording, script, supplied asset, or cited source, and that any mismatch is corrected before export.
11
8. Export for the destination, not for an abstract master
Review the final crop in the actual destination ratio. A layout that works in 16:9 may hide the speaker or shrink a chart too far in 9:16. Check that captions do not compete with designed callouts, the face stays unobstructed, and every visual remains on screen long enough to understand.
Keep the original recording, the selected source take, the approved transcript, and the exported delivery version. Record which aspect ratio, script version, and visual revision were approved. That makes later updates safer because the team can change a specific scene without guessing which source was used.
If you already have a clean recording, bring it to TapVid to add synchronized visuals around the original performance. If you want the detailed visual decision framework first, read How to Make Talking Head Videos More Engaging.
12
Should an AI avatar present instead? Decide before you add one
If no one on your team can appear on camera, you do not automatically need a synthetic face. For most product explainers, a clear voiceover over real product visuals is enough. An AI avatar earns its place in a narrower case: no one can record, and the script or interface changes often enough that reshooting would be a real cost.
While updating this guide, we read 25 Reddit threads from marketing, SaaS, startup, and instructional-design communities. Several contributors in the discussions we reviewed said avatars looked fake or cost viewer trust, especially with prospects. Several others said an AI or human voice over real screen recordings, photos, or simple diagrams worked better than a generated face. Other contributors still preferred a visible presenter, so treat the choice as something to test, not a rule.
Reddit evidence: real visuals instead of a generated face. In r/instructionaldesign, a practitioner answering a question about AI video quality wrote: "AI voice over real screen recordings, photos, or simple diagrams reads like a normal corporate video." This is one practitioner's experience with training videos, not a measured result. Read the original comment.
| Your situation | Recommended approach | Why |
|---|---|---|
| A real person can record | Record them and follow steps 1 to 8 | The recorded presenter stays the trust anchor. |
| No one can record, and the video is a one-off | Use a voiceover over real product visuals, with no face | There is nothing to regenerate later. |
| No one can record, and the script or interface changes often | Add an avatar for short intro or outro segments, and keep real visuals for the product | A changed line can be regenerated without a reshoot. |
| A sales video for prospects | Be cautious, and compare an avatar version with a voiceover version | Trust concerns came up most often for prospect-facing videos. |
| Onboarding, help-center, or update videos | An avatar can work | Contributors were more accepting when viewers already trust the company. |
Reddit evidence: the trust question. In an r/marketing thread about using AI avatars to front marketing content, one reply predicted the result would "look tacky," and another asked: "What would the AI avatar do that the voiceover didn't?" Read the thread.
What happened when we layered an avatar over an explainer
In September 2026, we tested the layout many teams try first. A real-time avatar from Spatius read a short narration. We recorded it and placed it in the lower-right corner of a finished TapVid explainer, at one third of the frame height. The result was a 28.7-second, 1080p demo in Chinese.
Test frame, about 12 seconds in. The explainer was designed without space for a presenter, so the avatar sits on top of the third content card. Review found three problems:
- The avatar covered the lower-right corner of content cards and panels in several scenes.
- It also covered the corner watermark in every frame.
- The recorder's own start marker was about 0.45 seconds off, so we found the real start of speech from the avatar's mouth movement before lining it up.
The useful information in that video was on the cards, not in the avatar's face. This single test does not measure how viewers respond. It does show a practical rule: an avatar laid over a finished explainer competes with the product for the same screen space.
If you add an avatar, keep the product in charge
- Build the explainer from your real product assets first. The avatar presents; it is not the source of product facts.
- Use the avatar where the screen carries no key information, such as the opening, a transition, or the closing line.
- If the avatar must stay on screen, reserve its corner before the scenes are laid out.
- After compositing, check every scene for covered prices, model names, buttons, and captions. Confirm that the voice still matches the lips.
- When the script changes, regenerate only the avatar segment and the matching scene.
13
Talking head video production checklist
- One viewer and one outcome are written down.
- The spoken script has been read aloud and shortened.
- Numbers, steps, comparisons, and concrete references are marked for possible visuals.
- The lens is stable, the face is unobstructed, and the target crop has been tested.
- The saved test file has clear audio and stable light.
- A clean master exists without burned-in captions or irreversible effects.
- Names, numbers, product terms, and negations are correct in the transcript.
- Every added visual has a defined information job.
- Supplied assets and wording remain faithful to the approved source.
- Each visual appears with the correct spoken line and product.
- The final video passes sound-on, muted, and smallest-screen review.
14
Frequently asked questions
What equipment do I need for a talking head video?
At minimum, use a stable phone or webcam, a microphone close enough to capture clear speech, and one controllable light. Add equipment only to solve a failure you can hear or see in a saved test. TapVid's current talking-head workflow accepts a phone or webcam recording, but a clearer source gives the transcript and visual plan better material to work with.
Will TapVid replace my face or voice?
No. The current talking-head workflow edits around the original recording. It keeps the real presenter as the source and adds captions and supporting visuals instead of generating a synthetic presenter.
What should I do immediately after recording?
Keep the original file, identify the selected take, and preserve a clean master. Review the transcript, then mark the numbers, steps, comparisons, and concrete references that need to become visible. Do not ask the face to carry every fact by itself.
Can TapVid repair bad audio or a badly exposed recording?
Do not rely on enhancement for those source problems. Select a coherent take and repair unusable audio, severe exposure issues, or footage mistakes in the appropriate editing stage before adding the explanatory layer.
How do I keep visuals from covering the speaker?
Plan the crop before recording, leave intentional space only where a visual may appear, and choose the smallest layout that completes the information job. During review, check the full target ratio and the smallest target screen. If a diagram or callout blocks the face, change that scene's layout rather than accepting the overlap.
How long should a talking head video be?
Long enough to complete one viewer job, and no longer. Record separate modules when the subject contains several decisions or chapters. Modular source takes are easier to enhance, review, update, and reuse than one long monologue.
Will viewers trust an AI presenter less than a real person?
Often, for prospect-facing videos. Several contributors in the Reddit discussions we reviewed said avatars looked fake or pulled attention away from the content, and some said they cost trust with B2B buyers. Others found avatars acceptable for onboarding, training, or update videos. If a sales video matters, compare an avatar version with a voiceover version before you commit.
How do I avoid stiff lip-sync and avatars that never blink?
Keep avatar segments short, settle the voice track before you generate the avatar, and add natural pauses to the script. Contributors in the discussions we reviewed reported fewer blink and motion problems with those habits. Settings differ by tool, so check your provider's documentation and review the result at full size before export.